|
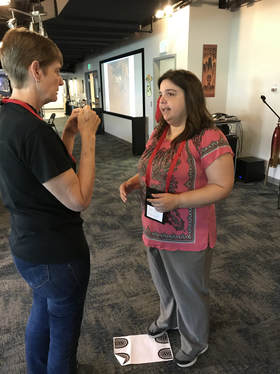
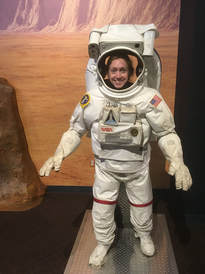
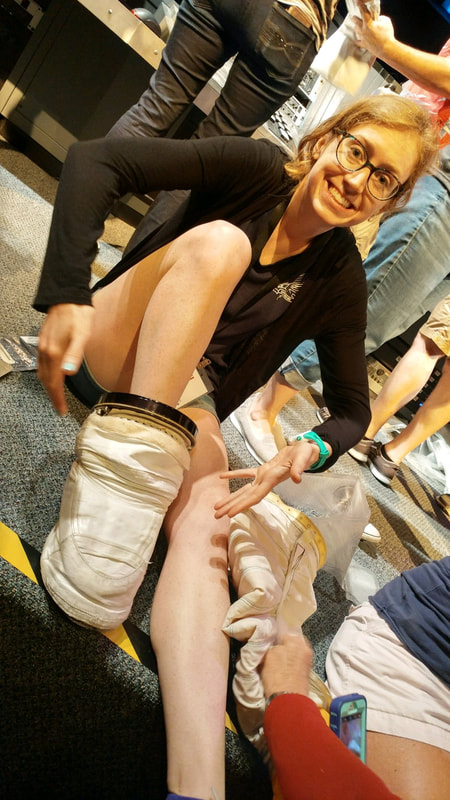
I was extremely fortunate to be one of nine educators from around the country to receive a scholarship to attend an awesome three day workshop at the Space Foundation in Colorado Springs. It was my first time visiting and it did not disappoint! 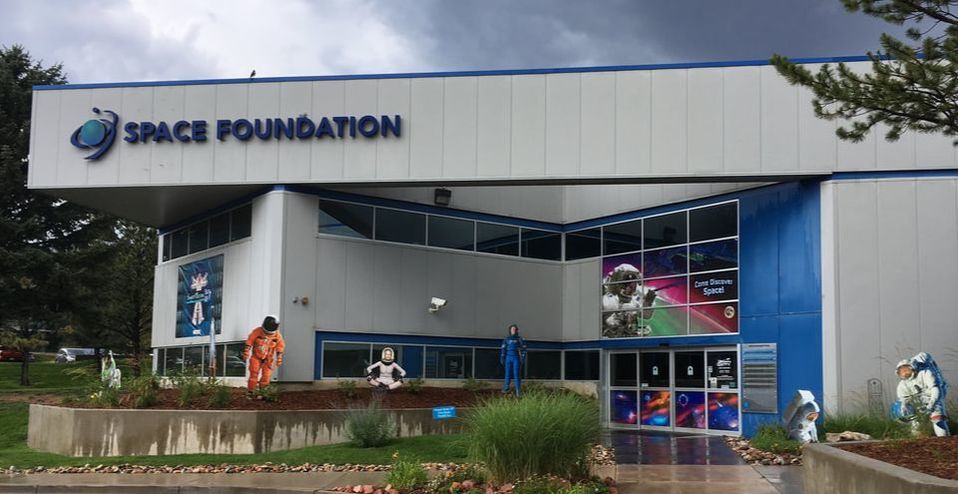 The Space Foundation Discovery Center's Current Theme is Suit Up. It is all about spacesuits and what is necessary of a suit for humans to survive in space. - If you live in Colorado, I would highly recommend bringing your kiddos on a field trip to the Discovery Center. - If you don’t live in Colorado, I would recommend becoming a Teacher Liaison. There are fore core areas of focus for teacher liaisons; Community Outreach, Teacher Education, Space Foundation Connection and Student Engagement. Applications for the next flight class are due November 23rd. The best part of the workshop, besides meeting rockstar TLs was how applicable all of the activities were to all of us. The TLs all came from different states, different school types, different grade levels and content areas; united by a passion for space education. The activities were exciting, hands-on and so much fun! My brain was constantly thinking about how I could bring this back to my school and share it with my readers. It was a jam-packed workshop, so I will be posting in parts. Each day for the next week, I will be posting an activity or group of activities that we did. I firmly believe that regardless of your excuse (grade level, content area, time, standards I need to cover, etc), you can incorporate space into your curriculum. My hope is that you'll be able to bring new ideas to your classroom and colleagues this upcoming school year! Copy THat, CapcomI’ve done a similar activity in my classroom, but this version was easier to implement with fewer materials needed. I was immediately intrigued by the title and thrilled when it began with the Apollo 13 C02 filter scene (see below). This is a great clip to spark students' interest and give them context for the activity and importance of a variety of skills including problem solving. Overview
* Students are assigned a role for each scenario, but they rotate among the roles throughout the activity. Roles
- unable to communicate directly with astronauts
- Cannot view main build or workstation build
- cannot view main build *If group is 4 members, there are 2 astronauts. One astronauts uses ONLY their right hand and the other astronaut uses ONLY their left hand. Room Set-up Example 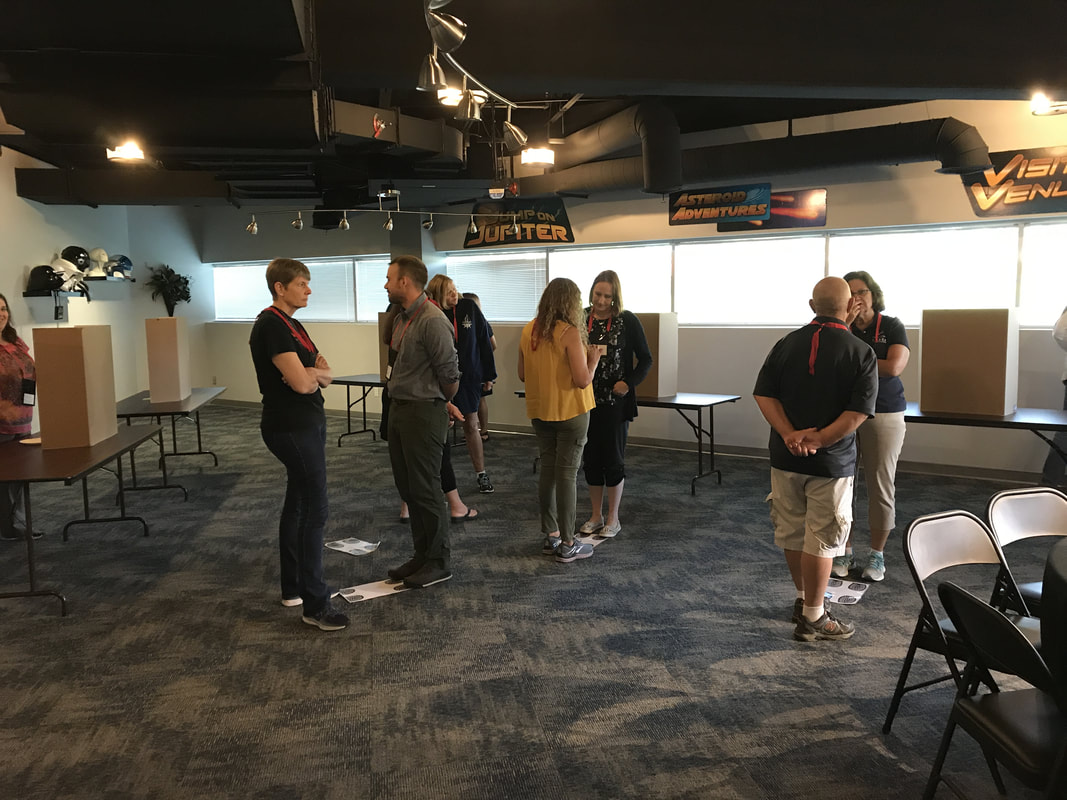 Engineer and CAPCOM are standing on assigned spots in center. Astronauts are at their workstations (behind tri-fold boards). Procedure 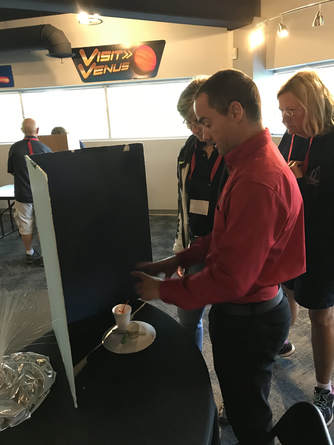 1.Flight Director builds something from materials available, behind their screen. *It's best to start out simple and gradually make the builds more complex. 2. Engineer observes build (once complete), heads back to spot and describes build to CAPCOM.
6. When team is confident in their build, Flight Director checks build and says yes or no* to indicate if build is correct. If build is not correct, team can repeat process above to fix. * Depending on groups, could say: Affirmative or negative GO or NO GO Check communication lines 7. When majority of groups are complete or after a specified time limit, student roles are reset. Flight Director creates new build and process repeats. Materials We used the following:
How can I adapt materials for my classroom? The materials can vary depending on your age group and what you have available. Each workstation should be on a table or desk. The key is to provide each workstation with some type of shield. The shield should be large enough so that hand gestures cannot be used to assist with build. Tri-fold or bi-fold boards work great for this, but you could also use a cardboard box. Each workstation also needs to have the same items used for construction. Do I need to use items that are similar to each other? The reasoning behind using 2 items that are similar is that it forces students to notice and describe what they see to their group members. If a student just said, use the cup, their group members wouldn’t know which cup. I hope this is awesome activity is one that you can see easily implementing in your classroom and sharing with others! All photo credits go to my fellow TL Denise!
Be sure to virtually visit tomorrow for Day 2 of the Space Across the Curriculum Series :) Peace, love and space exploration, - CAPCOM Conrad
3 Comments
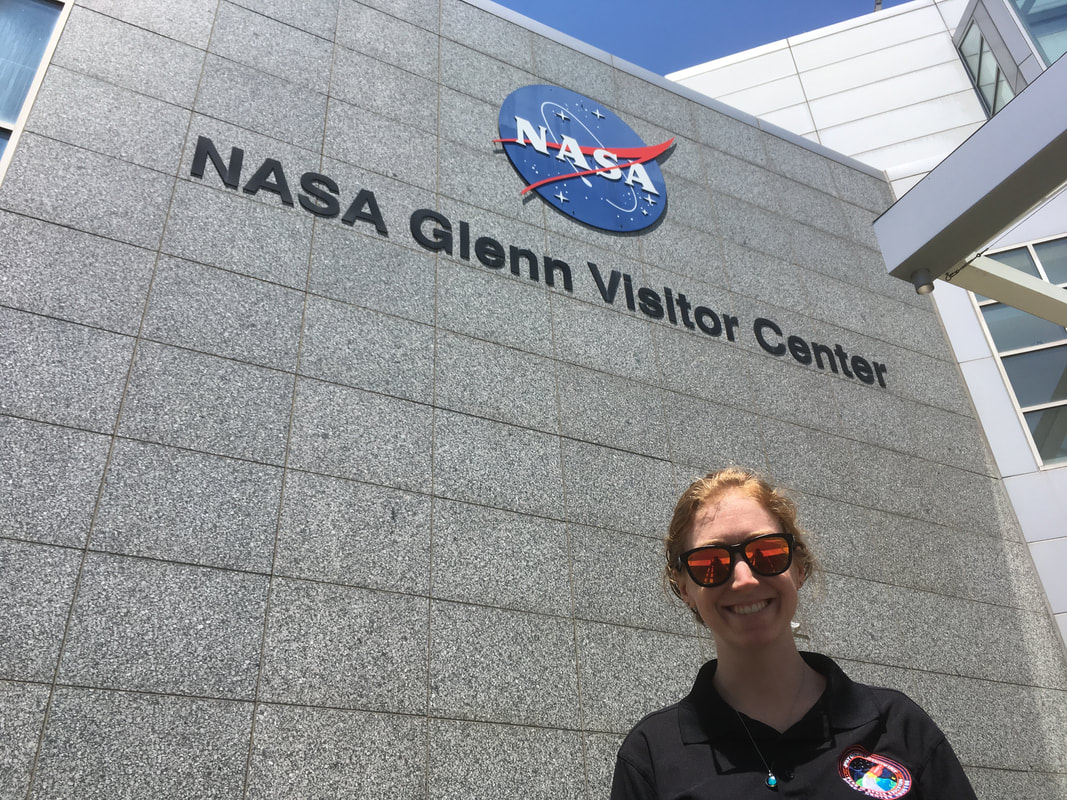
Did you know that NASA has centers and visitor centers around the country? NASA Glenn Research Center (GRC) is the Midwest NASA Center and the closest one to me. Although I wasn't able to visit GRC on such short notice, I did find out about future opportunities to do so. I also really enjoyed exploring the Visitor Center. Click below to see which one is closest to you! Did you know that each NASA Center has a specific focus and it's not all about space? Don't let the name - National Aeronautics and Space Administration - fool you! NASA does a lot to research and improve life on Earth! Goddard
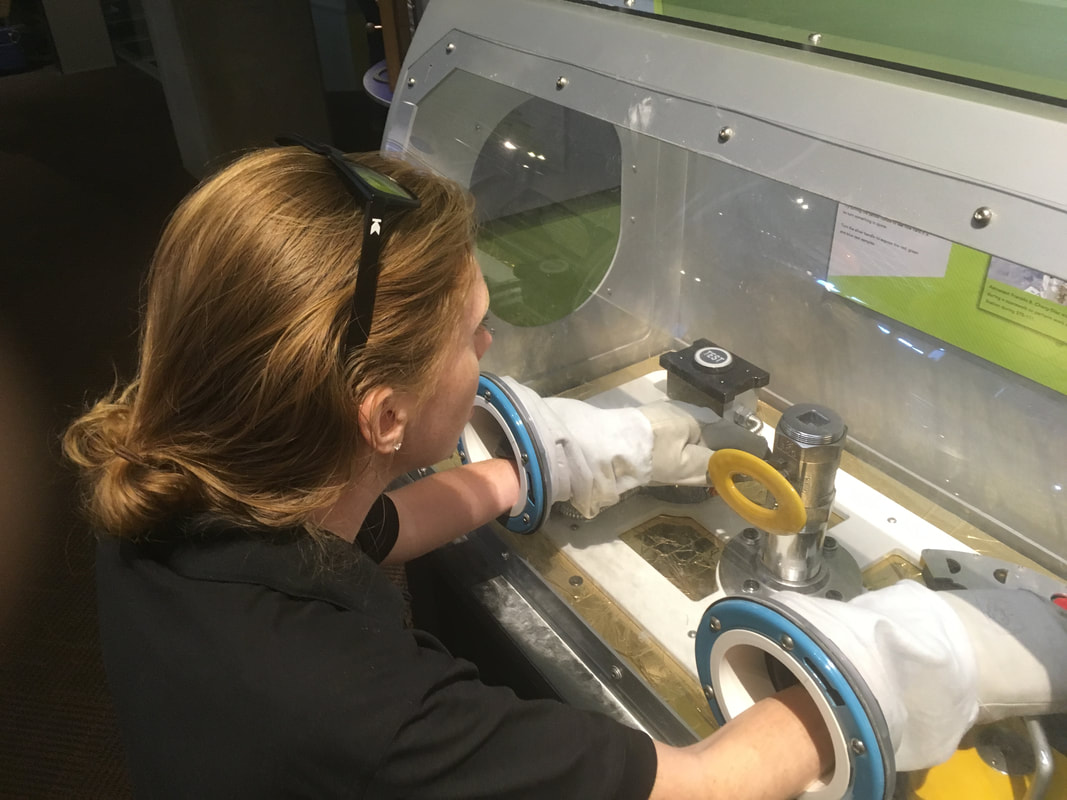
Goddard Space Flight Center was established in 1959. The center was named after Dr. Robert H. Goddard, a physicist whose area of expertise was rocket propulsion. Instruments build at Goddard are not only used to study the Sun, our solar system and universe, but also Earth. 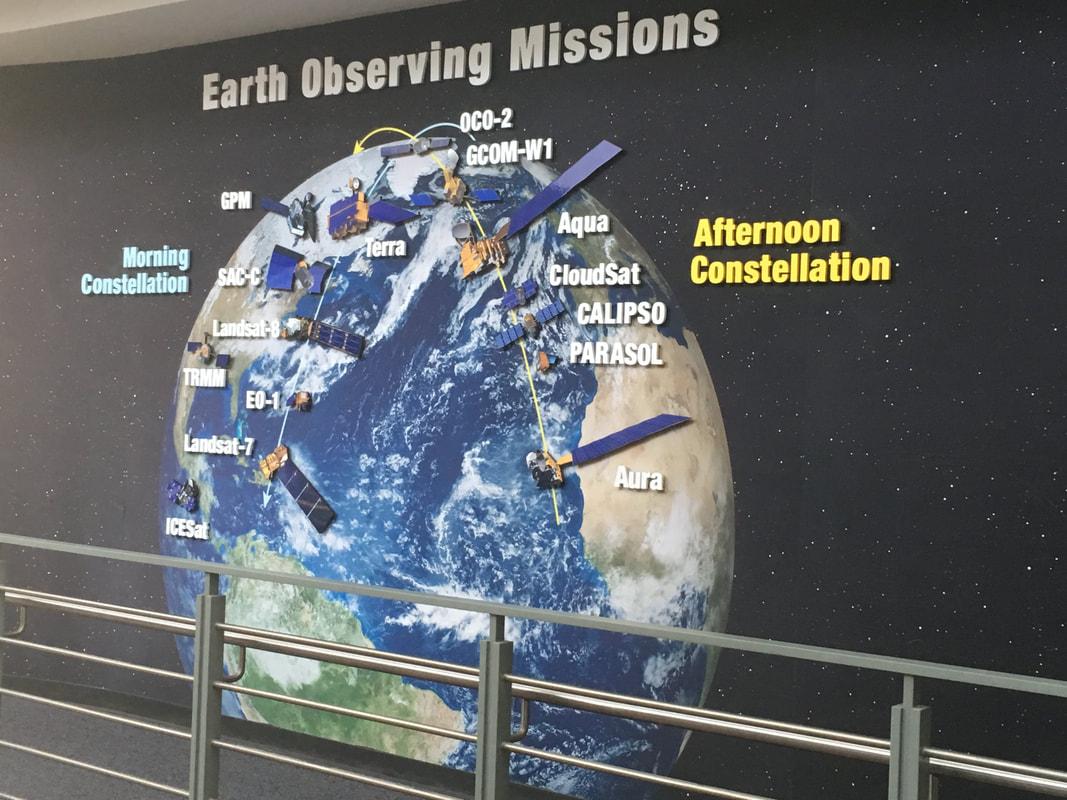 Not all of the missions pictured are still operational, but I was very surprised by the large number and admit that I hadn't heard of any of these missions before visiting! Check out all of the education resources related to the Global Precipitation Measurement (GPM) missions - water cycle, weather & climate, technology and societal applications. 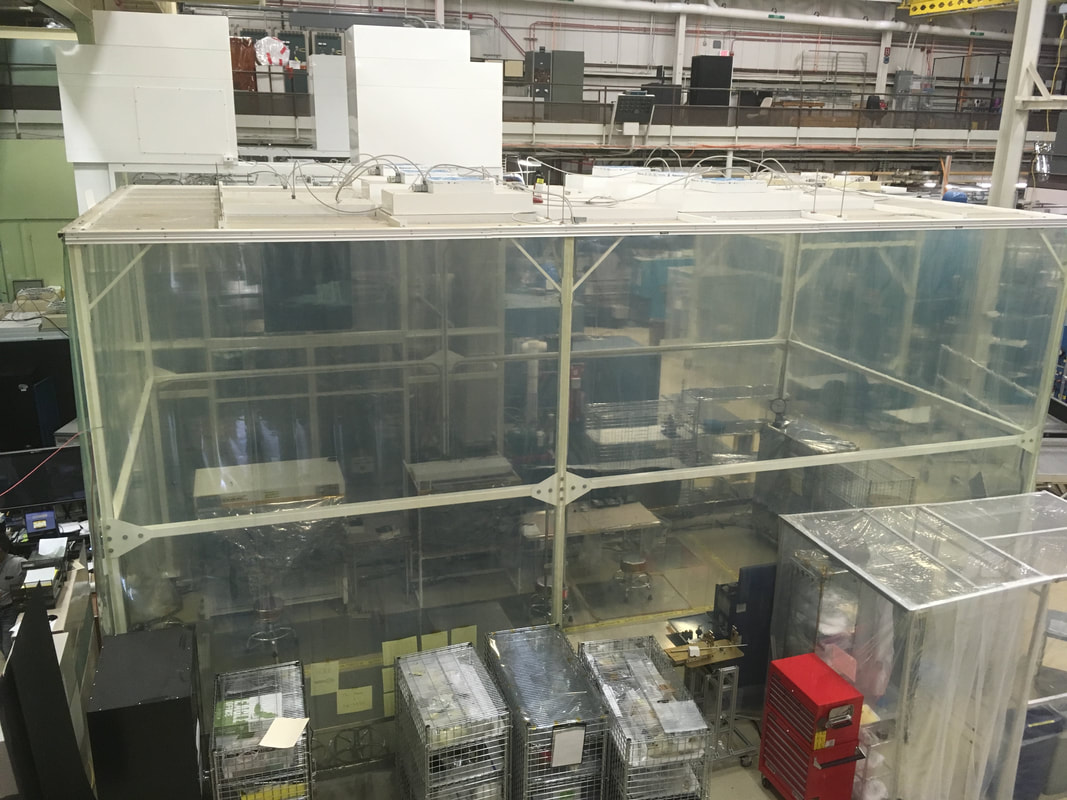 A Clean Room - Notice the structures on top, they make sure that dust and other debris is pushed out of the room. You don't want something traveling to space and interfering with data collection. Before entering a clean room, individuals have to wear what is known as a bunny suit to prevent human contamination (hair, germs, cells, etc). 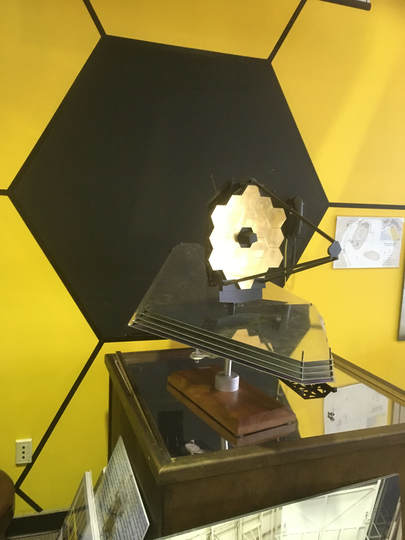 A JWST scaled model. The mirrors are made from Beryllium because it is able to keep its structure in the harsh environment of space with extreme temperatures! 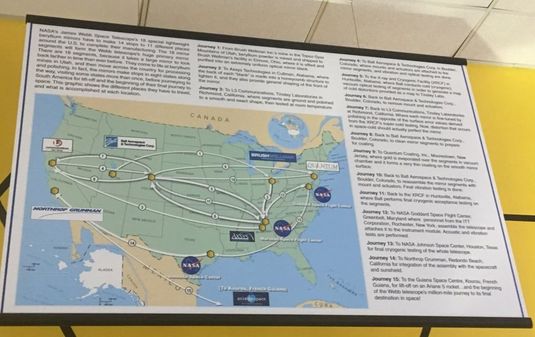 Talk about collaboration - check out the Journey of the James Webb Space Telescope! It was in a chamber at NASA Johnson in Texas during Hurricane Harvey. It will launch from French Guiana, a European Space Agency site. 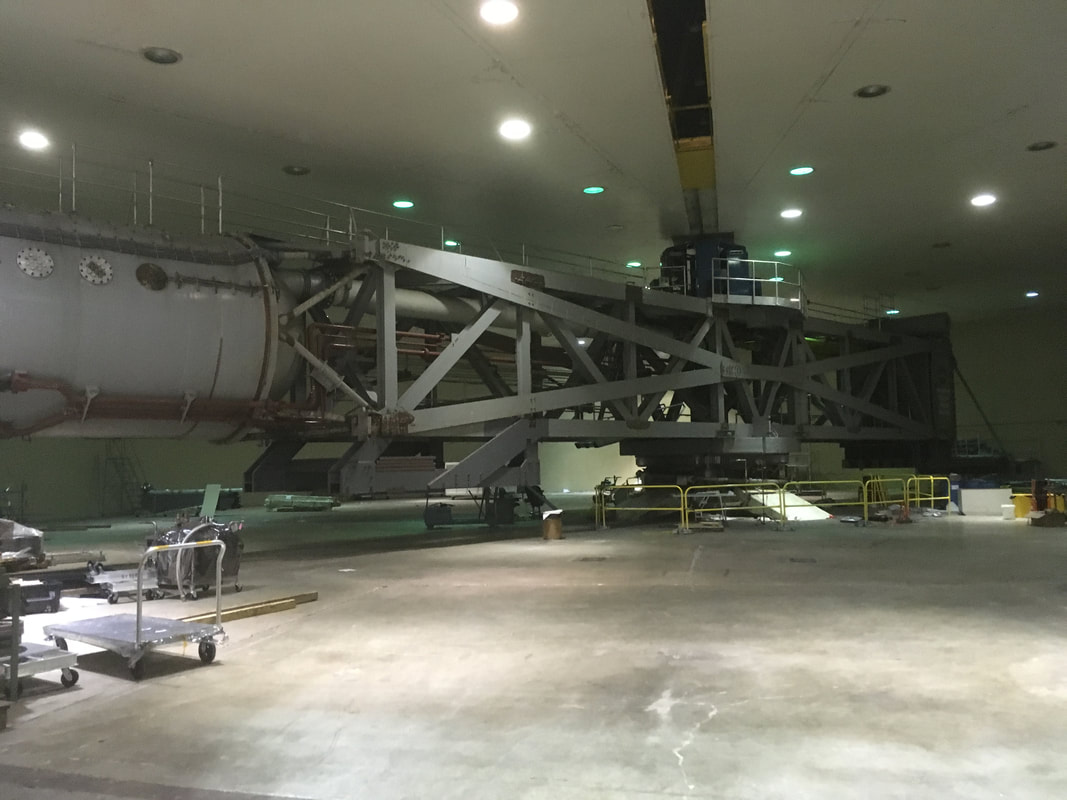 This giant piece of equipment -takes up an entire room- that I refer to as the centrifuge, was built in the 1960s and is still operational. Spacecraft at this time were smaller and the entire thing could fit to be tested. Now, it just tests parts of the spacecraft. To use it, it requires a lot of power and a call to the utility company! 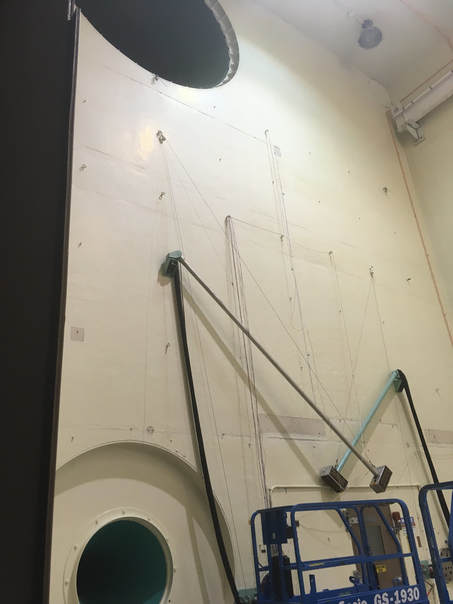 Acoustic Chamber - sound is blasted through the two circles you see to make sure that vibrations will not affect any of the systems on a spacecraft. Despite the vaulted door, employees have to be warned and can hear sound coming from the chamber. 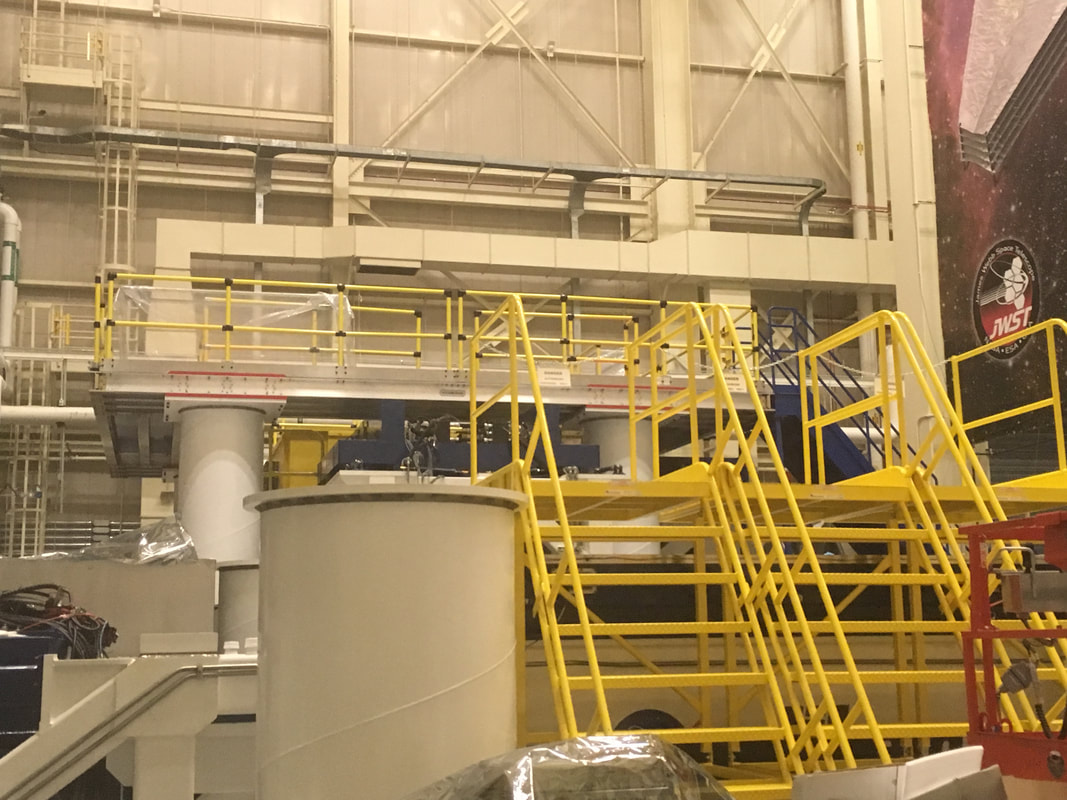 Sometimes it is rocket science! The JWST was too big to fit on the previous shake table, so a new larger one was built. The shake table's purpose is to simulate the movement experienced during launch. GlennI would really encourage you to check out the Great Lakes Science Center. It is the home of NASA Glenn Visitor Center and has so many awesome, hands-on activities related to spaceflight! It is a great museum for all ages and interest levels on the water, right next to the Rock and Roll Hall of Fame. It's not all about space, but that's what we explored. They do a great job of promoting science and their motto is stay curious! We loved the interactive nature of everything and the connection that was made between the activities and why it was important for space exploration. Some of our fun is pictured below, but there was a lot more for you to experience in person; a shuttle landing simulation, rocket launch by building up air pressure, determining which ISS systems could be powered when the solar panels weren't in sunlight, aerodynamic experiment with shapes. My husband, a middle social studies teacher, excitedly tried all of the activities! 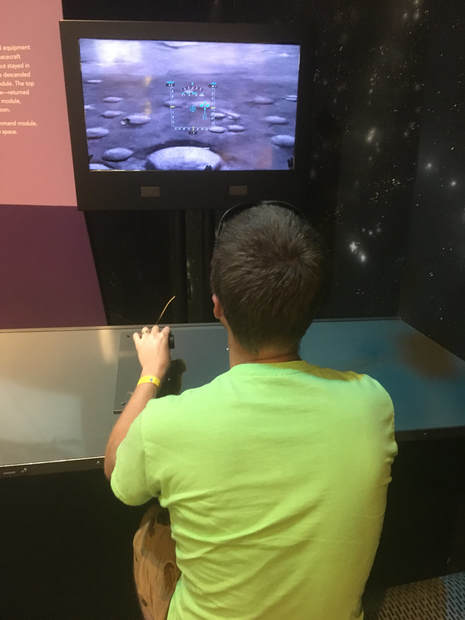 My husband attempting a moon landing of the Lunar Module. 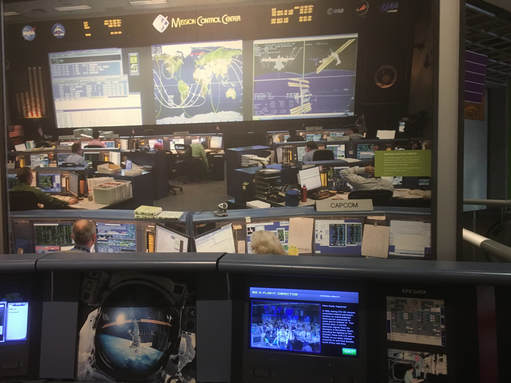 Acting as a Flight Director; analyzing input from others to make decisions to keep the crew safe and accomplish the mission objectives.
Check out this FREE upcoming educator workshop at NASA GRC Middle and High School Teachers Monday August 13th 9am-4:30pm  > If you aren't able to make it, sign up for their mailing list to keep updated on future opportunities. > In the meantime, check out their awesome Engineering Design Challenges for your classroom! Goals
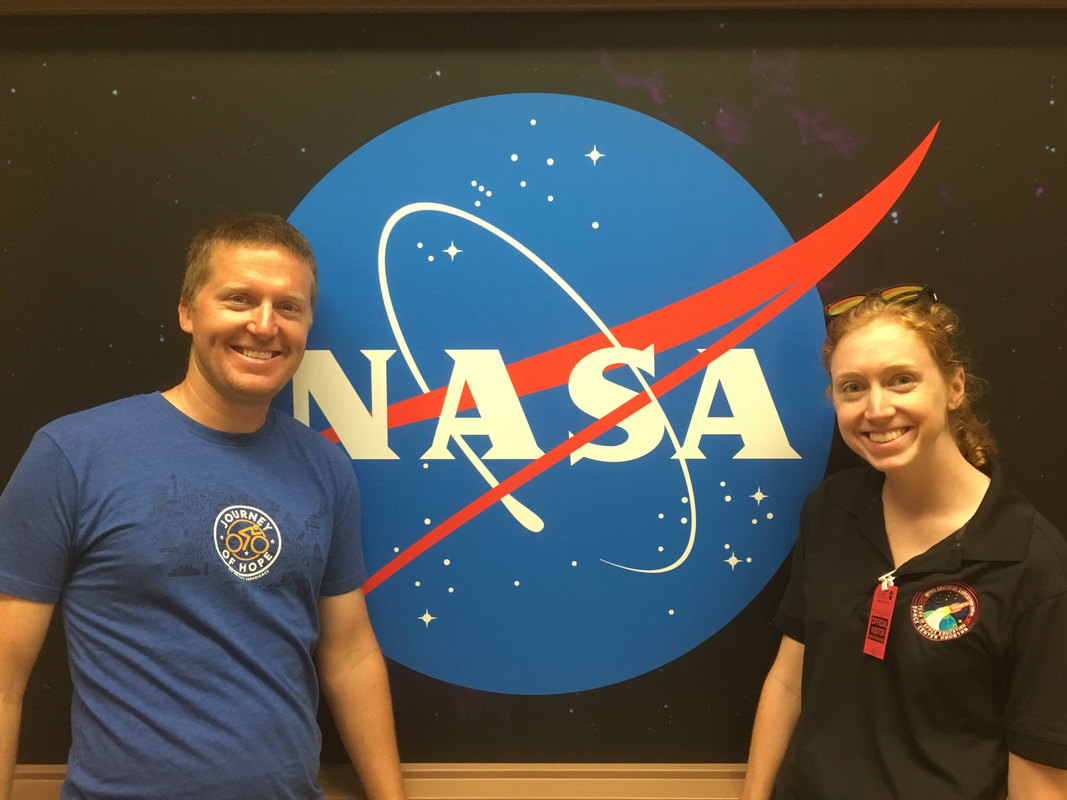
As you prepare for a new school year- whether it's updating or bigger changes; a new grade level, new school or new school district - think about your space goals! If you or a colleague are looking for resources, have questions about something I've done in my classroom, have an idea for a lesson or unit an unsure the best way to implement it, please reach out! I love collaborating!! Tomorrow I'm headed to Colorado Springs for the Space Foundation's Space Across the Curriculum Workshop!! After all, the ISS is a 20 year collaboration of 15 countries and 5 space agencies. Together is better!
It all started with a movie trailer. It was about high schoolers entering an underwater robotics competition. A few weeks later I couldn't remember the title, but I knew that I wanted to watch it. Luckily, my husband did. So, I went to the library and rented the movie Spare Parts. It was a great movie, released in 2015 and one worth sharing with your students to get them excited and inspired. Check out the trailer below. Maybe it's just me, but I love reading the words inspired by a true story. When those words come across the screen, I immediately want to find and read the book! However, this story actually started with an article in Wired magazine in 2005. 11 years later, Joshua Davis - the writer of the WIRED article - also wrote the book, titled Spare Parts: Four Undocumented Teenagers, One Ugly Robot and the Battle for the American Dream. I read the book in a couple days and really enjoyed it. I enjoyed learning more details about the lives of the kids portrayed in the film. I think it would be a great book for middle school or high schoolers. It could be part of a book study, whole group, read aloud or after school. While it's not an astronaut story, I would definitely share it with my former students who, when reading Hidden Figures, were curious about what it was like for them. My Hispanic students were interested in the story and in learning about segregation, but they couldn't fully relate to the African American characters. .As I've been diving into the story, I actually discovered that before it became Spare Parts, it was a documentary called Underwater Dreams. This award winner was named as one of Best Family Movies of 2014 by Common Sense Media! Maybe the coolest part is that 50% of proceeds go to Carl Hayden Robotics team and TheDream.US . You may be asking yourself, I thought this was a blog about space exploration, so what does an underwater robotics competition have to do with that? Well, NASA is one of sponsors for the MATE (Marine Advanced Technology Education) competition. The competition is also all about ROVs (remotely operated vehicles). Think Spirit, Opportunity, and Curiosity, and I'm just talking about the characteristics, I'm talking about Mars. Robotics also involves STEAM principles and definitely is a hands-on application of science process standards and mathematics practices. It also requires teamwork and problem solving skills. In the 1950's it seemed impossible that a man could land on the moon. Likewise, In 2004, it seemed impossible that four kids who lived in the desert would excel in a national underwater robotics competition. What's awesome about MATE is every year's competition involves a back story. So, the competition is tied to a story, talk about an awesome language arts connection. Writing and reading become a lot easier when it's about something that you're interested in! I wanted to share this awesome story to hopefully inspire some of you to check it out and share it with your students. If your school already has a robotics team, here's a real-world connection. If not, maybe it's something worth looking into and learning more about.
Be on the lookout for more book suggestions and resources as that is what I plan to focus on in the blog this summer. Peace, Love and Space Exploration, - CAPCOM Conrad The Golden Record has a collection of songs, sounds, greetings and images of Earth. So, each student chose a song, sound, greeting and picture to represent them. They put all of this information on a website that they created. Next year, we’re thinking it would be a good fit at the beginning of the year. It allows you to learn more about your students, so it would be an awesome getting to know you activity. It is also a great way to embed digital skills with content, especially since our 6th grade students are going 1:1 with Chromebooks next year. Students used Google Suite products (Google Classroom, Google Slides, Google Drive, Google Docs and Google Sites) to share their information. If your school doesn’t use Google products, there are other ways, but Google is the most user friendly. We used the Science Learning through Engineering Design (SLED) structure, mentioned in previous blog posts. The great thing about the SLED structure is that it has both an individual component and team component, so students get to share their voice, but also need to learn how to collaborate with others for a successful product. It’s not just a science project. It also involves language arts, social studies, technology and engineering standards. It is a very student-driven project. We were guides and facilitators. We would begin each day with a recap of what we’d done the previous day and what student tasks needed to be completed. Mission ObjectivesHere are the objectives that students were working on achieving by the end of the project. Content and language objectives are part of the SIOP Model, which is to help educators meet the needs of English Language Learners. I've also found that it's a great way to begin a lesson and allows for consistency. I have different students read the objectives. When planning a lesson, it helps me pinpoint what exactly I want the kiddos to do. I think it also helps the kiddos be in the know. For big projects, I write a set of objectives that I want the students to meet by the end of the project. I don't write separate ones each day. Content Objectives: (What are we going to learn about?)
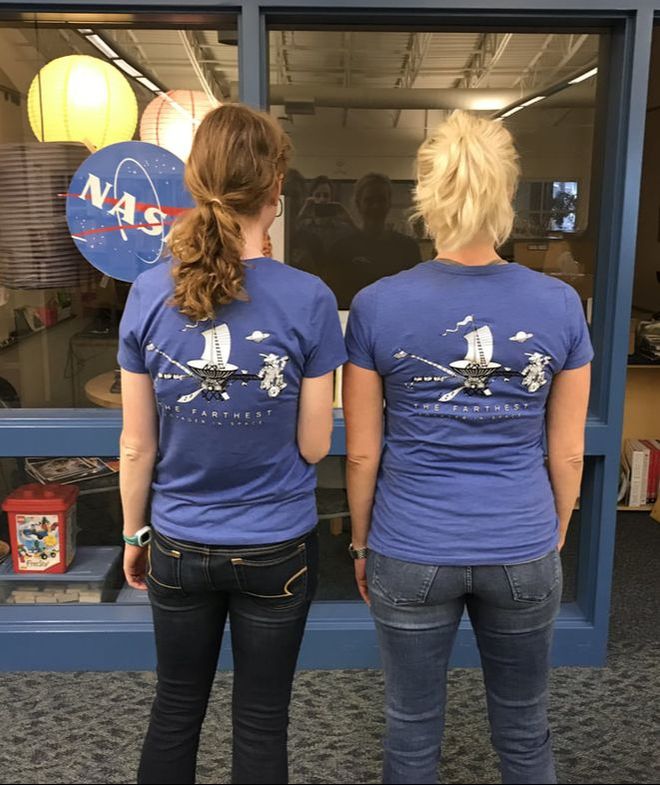
Day 1> Design brief - Paragraph summary of background information related to the challenge. After students read the design brief, they are able to identify the following elements listed below. > Identification - Problem, Goal, Client, End-user, Criteria, Constraints > Individual Design Chart - 3 potential options for each category (song, sound, picture and greeting) and reason for each option. If you run out of class time for students to work on this, it would be a good homework assignment. It's all about them and their opinions, so it's not something that they need explanation or much support. Day 2> Finish Individual Chart, if needed > Team Brainstorm - The focus was on sharing ALL of their options for ONLY one of the four categories (image, song, sound OR greeting) from their Individual Chart. We told students to choose a category that they were having a hard time narrowing down to one option and would benefit from feedback. Each student had uninterrupted time to share their options from their chosen category. This was followed by warm and cool feedback statements from group members. > Create Google Site -> Each lab group created one Google Site. Each group member got one page on the group site. Students had to create a descriptive title. Add ALL group members as collaborators. Add one page/student in the group. Day 3> Work Time - Individual Design Tasks Students worked through a checklist and had specific components for each category (picture, song, sound and greeting). Students were able to view Screencastify video demonstrations to help them with these tasks, if needed. Day 4> Work Time - Individual Design Tasks continued Day 5The Documentary is available to purchase on the PBS website or you can watch it on Netflix, Amazon or iTunes. We did not have time to watch the documentary, but it is a great resource. It is ~97 minutes long. **Depending on the age of your students, be aware that there are images of the human body and reproductive system at minute 9 and minute . It would be good to watch before the unit, during the unit (15 mins/day) or afterwards as a wrap-up activity. > Reflection - Journal Entry Questions > Web Design Reveal - Students had their website pages up on their Chromebook screens. Students rotated to another group member's seat and reviewed their website page. They were able to listen to the song chosen. Students shared warm and cool feedback on post-its. Warm and cool feedback is something we'd working on before. Warm feedback is a statement that starts with I like how... and provides positive observations of the work . Cool feedback is a statement that starts with I wonder if... and provide ideas for improvement. 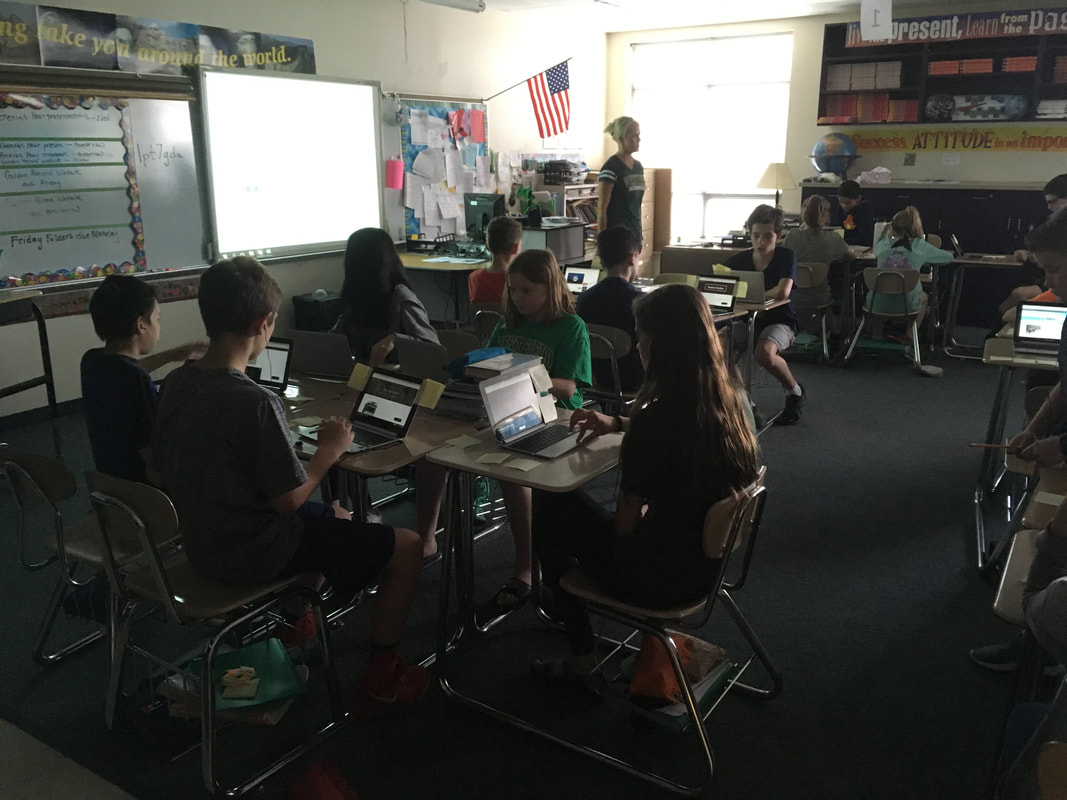 Web Reveal in Action 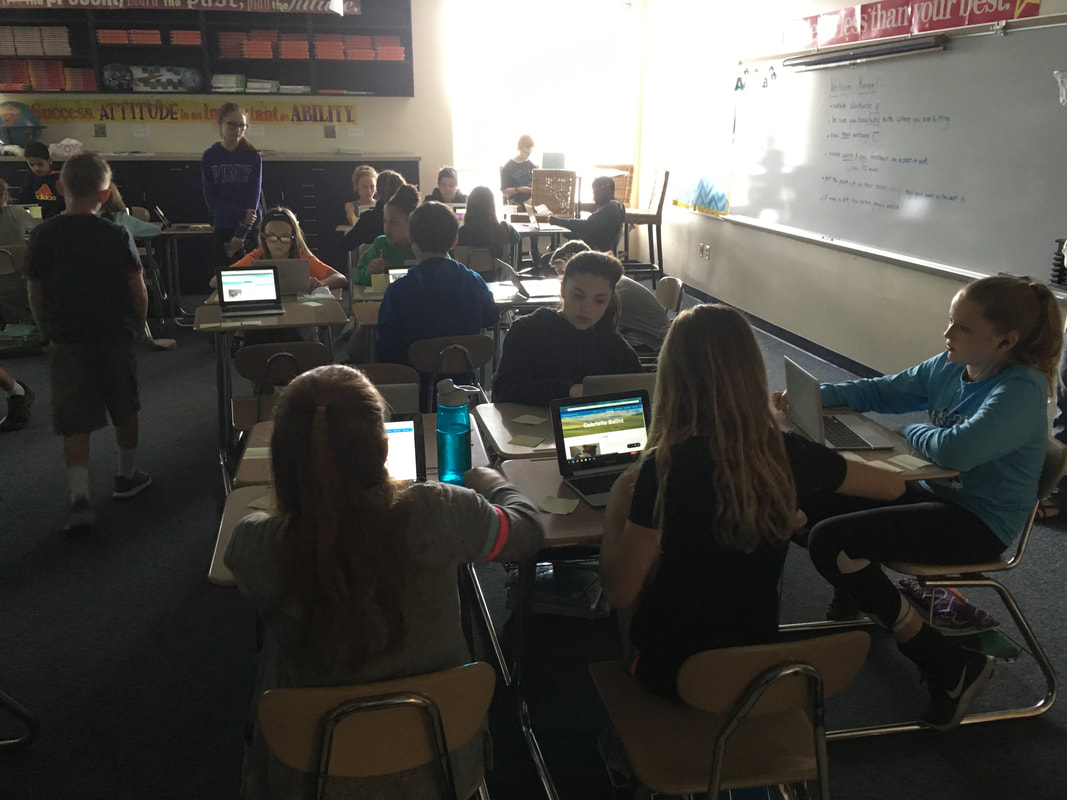 Students evaluating websites and providing warm and cool feedback. The best part of the project was reading student reflection after the project. Students answered questions in a Google Form. Some questions were rating scales, but we got the most information from were the open ended questions. I was so impressed with the thought and consideration that they put into their answers: - Before this design challenge I... - After this design challenge I... - How would you describe this project/what you learned/were able to do? Here are some student statements to answer the last question. "This project was definitely one of my favorites this year. I loved how you got to mix your personal life with a awesome space project. I learned how to use google sites, and I learned space and many other things can tie to you in many ways." The logbook, video demonstration links and The Farthest- Voyager in Space Documentary questions will be added to my TPT store.
Peace, love and space exploration, - CAPCOM Conrad I have learned a tremendous amount throughout this past week with the Voyager Design Challenge, as I know the JPL scientists have been learning from the Voyager Spacecrafts themselves. The digital tools and skills are a work in progress, as the development of the Voyagers were. Despite the lack of familiarity or experience with the digital requirements students have been asked to complete, they have problem solved and persevered to create their own time capsule and piece of a golden record. Helpful ResourcesThis is a great one-stop for all Voyager information from NASA JPL (Jet Propulsion Laboratory) , home of the Voyager missions. 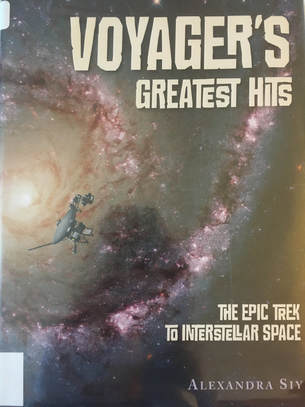 When searching for books about the Voyager, there aren't many, especially for kids. I found this at the library and after reading it, decided to purchase it. A great PBS documentary available to purchase or watch on Netflix, Amazon Prime or iTunes. I am thankful to have received a copy of this on DVD at Space Center Houston's Space Exploration Educator's Conference (SEEC) in February. I'm working on creating discussion questions that you could use in your classroom. key things to a successful voyage1. Co-teaching It’s true what they say about two heads being better than one!Being able to brainstorm, problem solve and learn along the way made this the best experience it could be for the kiddos - and us, teachers. I’m not saying that we didn’t experience challenges, but we were able to tackle them. Collaboration is key. It also helps having another teacher to be able to answer student questions and work with them one-on-one.
2. Set the stage Kiddos are curious when things change. This curiosity gets them to ask questions and be engaged in the project as soon as they walk in. They get excited about artifacts, books, posters and attire. The posters were printed and set up so students could see them as they walked in and grabbed their logbooks. On Friday, Paul brought in his equipment and helped set this up. Jaime and I cheered when we were able to hear the UN Secretary General speaking. The kiddos walked in and immediately walked over. Some knew that it was a record player. Others had no idea. They thought it was cool that we had the Golden Records playing. They even started dancing to a Bach Concerto! It definitely made my day :)  I was ecstatic to find a Golden Record set from Light in the Attic Records. The set came with 3 LPs, a booklet with all of the images, list of sounds and song sand the greetings in 55 languages - translated in English. 3. Structure We planned the project to use the SLED structure that students are already familiar with to guide them through the process. This simple structure allows students to dig deeper, search for information and promotes design thinking. Students also have to evaluate and defend their ideas. The Innovator’s Compass and LAUNCH Cycle were also a part of the structure. As student’s completed tasks, they were moving through the LAUNCH Cycle phases. The last phase is to LAUNCH to an Audience, which students do through their creation of a website. The Innovator’s Compass was a helpful tool for students during the Navigate Ideas phase. We started each day with a video clip related to the mission. We made an example of the final product for students to refer to, as needed. 4. Flexibility Since students are in the midst of standardized testing, classes were shorter than normal. This is one of the things we had to be flexible about because the kiddos needed time to create. The unit had overall objectives that students were working towards by the end of the project. After realizing that the students needed more help with completing the specific design tasks, we created how-to video demonstrations to provide a reference. We decided to extend the unit by a couple days so that students had more work time to finish the requirements. The kiddos have been excited to learn about the Voyager missions and more specifically, the Golden Record. My next post will be more specific on each day of the unit, as students are still working on it now! I hope you’re intrigued and find the resources and reflection helpful. I’ve had a blast co-teaching and seeing the kiddos’ enthusiasm. Oh, the power of space exploration education! Peace, love and space exploration
-CAPCOM Conrad Probably not, but with the crazy weather Indiana has been having, you can sled on Earth in April! Last summer I attended the Science Learning through Engineering Design (SLED) Summer Institute. SLED is a Purdue University program funded by an NSF Math Science Partnership and is a true collaboration among several schools and departments. It was a great hands-on experience and I took a lot from it; including how to set-up and use a notebook, vocabulary and the overall SLED structure. SLED is targeted for 3rd-6th grade students, but I definitely think it can be used in other grade levels. SLED has curriculum available for many different science and engineering standards. The curriculum available is great, but what I find the most value in, is the structure and questioning. The structure is simple, yet powerful. The best part is how meaningful and interactive it is for the students. I've been able to see this firsthand. The collaboration and conversations students have with each other is awesome!! SLED allows each student to be individually involved in their learning while also working with their peers. Students have to make choices and defend their decisions. The structure and terminology remains consistent regardless of content or standards being covered. I have been able to co-plan 2 units with my awesome coworker Jaime using the SLED structure and incorporate space exploration! The first unit was Lunar Landers about a month ago and the second unit is next week. It's all about the Voyager Spacecraft and the Golden Record! Stay tuned for updates on that. We're really excited about it!! Lunar Lander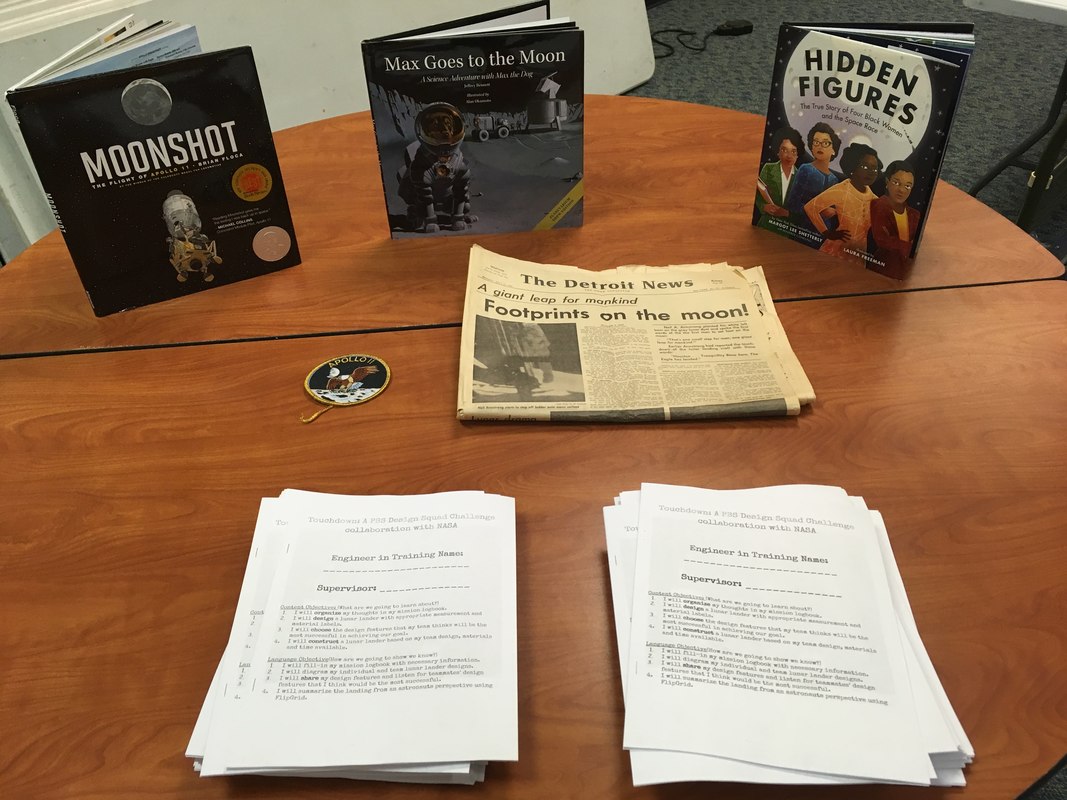 My awesome, former coworker, Steve taught me that kids are more excited when you set the scene. Students grabbed a logbook from the table when they walked in on day 1. The Lunar Lander lesson we modified was a NASA PBS Design Squad Challenge called Touchdown. It is one of six space-themed engineering design challenges in the On the Moon Activity Guide. Our modifications included putting the activity in the SLED structure, utilizing the LAUNCH Cycle (Design Thinking Framework) and Innovator's Compass. Exploring Beyond (2:36) - NASA Johnson This is a great video to get kiddos hooked. I saw it for the first time at a Space Center U Teacher Professional Development at Space Center Houston last summer. SLED STructure1) Design brief - Create a short story that gives meaning, purpose and connection to the activity. Students read a couple paragraphs to determine background information. 2) Identification - Using the design brief, students identify the following & record it.
4) Team Design - All teammates share individual designs and provide ONLY positive feedback. Best way to do this is to have a time limit (1 min) and review expectations for this process.
6) Test - Each team tests their design. *Determine how design will be tested BEFORE testing. 7) Communication - Share results
8) Improve and redesign Check out the Kiddos in ActionAssessment OptionsThis whole design challenge process is a performance assessment. A) Formative Assessment happens throughout this process with the logbook. - Observing student designs and asking them to explain the different features and why they chose them. - Listening in on team design brainstorms. It's a great way to evaluate team dynamic, group member's collaboration and students' abilities to persuade, defend and support their ideas. B) Summative Assessment - Checkpoints - Team Design Data - Did the design meet the requirements, constraints and solve the problem? - Science content -> How is the student able to explain? - Overall Evaluation Rubric - Redesign -> How did they makes changes to improve their design? Instead of using a notebook, we used the SLED structure to create a logbook for students to fill in. Each day we had mission checkpoints. After testing, students also answered journal entry questions to reflect on the process. Students recorded a FlipGrid video to describe their lunar landing from the astronaut's perspective. **I will be adding our logbook to my TPT store. Tech Tool: FlipgridThis awesome tech tool was also introduced to me at Space Center Houston last summer. It is FREE for educators! At first I wasn't sure how I would use it with my kiddos, but it's a great tool for your toolbox. It gives students another way to respond. You create a grid, give students the code and they can record their own video response to questions or prompts that you ask. Like many new tools, especially technology, I would highly recommend reviewing expectations, appropriate responses and commenting, etc. I tell my students that technology is a privilege and they need to use it correctly as an educational tool. *Note:It does requires a device with a camera to use. Settings/Options - Moderator - Allows you to view student videos BEFORE they are added to the grid. - Design - Allows students to add stickers - Reply capabilities - View, rate, comment and/or record a reply post - Rubric and evaluate them. - The free version allows a maximum of 90 second record time. Students love talking with peers, sharing their individual thoughts and ideas, responding to others and making videos, so why not allow them to harness this excitement educationally? I hope that you're able to use some, if not all, of this in your classroom! I've been very happily busy co-designing and teaching projects that I'm excited about. Therefore, I am behind on updating my TPT store with resources. It's a summer project, if not before.
Peace, love and space exploration, -CAPCOM Conrad My first project as a SEEC Crew member was the Hidden Figures Unit that I created over my Spring Break almost a year ago, which is hard to believe! I really enjoyed creating the unit and teaching it to my kiddos. I also saw the value and interest that my students took in it and enjoyed sharing the journey on my blog. When I created the unit, I just taught it to my homeroom students at first. I was not trying to keep it from others, but I wanted to wrap my head around it and see how it all worked before sharing it with others. It was like a pilot program and I made changes throughout the unit as I found more helpful resources. I've been excited to hear that other teachers have been sharing the Hidden Figures Young Readers Edition book with their kiddos too. A few teachers at my school are actually reading it with their kiddos right now. A couple weeks ago, a teacher asked if there was an audio recording of the book. I thought I had found a lot of the resources available and I have to admit that a recording was not something that I had ever searched for during this process! In case you're curious, an audiobook does exist. We thought that it be a great project for students though; creating their own version of an audiobook. We wanted it to be more than just a recording however. So, each group is assigned a chapter and they're focused on identifying the characters and key vocabulary. They will also write a chapter summary and create a wordle to represent the chapter. All of this information will be typed in Google Slides. Using the resources available to students, their Chromebooks, we decided the best tool for them to use was Screencastify. Tech Tool Feature: ScreencastifyScreencastify is an extension for Google Chrome. You can add it to Chrome for free by using the webstore. What's great about Screencastify is that it's easy to use and with the free version, you can record videos up to 10 minutes. I'll be honest, I found that out because I reached the limit! Screencastify allows you to record your voice over your desktop or if you have a webcam, you can also record a video. Since Screencastify is a Chrome extension, it creates a folder in your Google Drive and automatically stores all of your videos there! It acts like any other files in Google Drive, so you are able to share it too. I've been using it to record my desktop and create demonstration videos to teach students how to do something (like create an action plan in Google Sheets). It's a great way to meet the needs of your visual and auditory learners. They are able to watch the video at their own pace and pause it, if need be. It allows students who have been absent to catch up and allows teachers to save their voice from repeated directions. Book Shout OUtA Hidden Figures picture book was released in January and it's great! It's by the same author (Margot Lee Shetterly) and is titled Hidden Figures: The True Story of Four Black Women in the Space Race. It's a good way to build background for students before reading the Young Readers Edition, as a way to share the story with younger students or you don't have time to tackle the Young Readers Edition. I would highly recommend it. The illustrations by Laura Freeman are eye-catching and full of color and the book is informative and entertaining. You may know that Scott Kelly has a book for lifelong learners called Endurance: A Year in Space, A Lifetime of Discovery. I haven't read it because I'm currently engrossed with Riding Rockets - The Outrageous Tales of a Space Shuttle Astronaut by: Astronaut Mike Mullane . You may not know that Scott Kelly also has a picture book called My Journey to the Stars. It's a great combination of illustrations by Andre Ceolin and pictures that connect with a younger audience. In the book, Scott talks about events as a kid and his life as an astronaut. See what he says about the book, in his own words below. The students are in the midst of this Hidden Figures Podcast Project. As they progress, I'll be sure to share!! In my true fashion, I have created resources and a rubric, of course, that would allow you to create your own project in your classroom. As soon as formatting is complete, I'll be putting it in my Teachers Pay Teacher store. Tinkercad resources will be added soon as well. Students are using Screencastify to create a virtual tour of their solar system!! This week, I'm co-teaching what we're calling, Mission Days. We've adapted the NASA & PBS Design Squad Touchdown lesson to incorporate the Purdue SLED (Science Learning through Engineering Design) structure. I've been thrilled to continue to also share space exploration outside the classroom as I embark on my second year in space. A few teachers have been showing the PBS Documentary, A Year in Space , that chronicles Scott Kelly's journey, to their classes. One teacher asked if she could borrow it to take home because she had been talking about it and her husband really wanted to see it. A couple of nights ago when I went out to dinner, the host stopped me. I was wearing my Crew jacket and he asked what my patch was. I explained that I was a teacher who was working on lessons to teach space exploration. His response was "dope". From a teenage boy, I would say that's a pretty big compliment! I can't wait to update you more on all of these awesome space happenings! Until then... Peace, love and space exploration,
- CAPCOM Conrad As we work to prepare our students, the Mars Generation, for the future, here's a hilarious reminder of why we teach and why teaching digital skills is so crucial! A Millennial Job Interview by: LA Reel House Media In case the video clip didn't convince you, I've seen the transformation in student engagement and excitement when you use the right technology tool to enhance a lesson. Thanks to Alex, my fellow Crew member, for sharing Tinkercad - and how she uses it in her classroom to integrate space exploration - at SEEC. I've seen it used before in a related arts class setting, but it doesn't have to reserved for that. I hadn't considered using it myself with kiddos until now. I mentioned it to a sixth grade science teacher and she wanted to try it out, so this week, we planned and co-taught 3D Design in Tinkercad. It was a perfect fit with state standardized testing. It is a great tool with unlimited possibility for your classroom! Being new to Tinkercad and 3D design, I wasn't sure how it would go, but the kiddos blew me away! Tech Tool Feature: TinkercadTinkercad is a free online program that allows users to 3D design. The word tinker means to try to fix something, usually in an awkward manner. CAD is actually an acronym that stands for computer-aided or computer-assisted design or drawing. It depends who you talk to. Autocad is a software used by engineers to create models. It's exciting that now students can develop these engineering and design thinking skills. The great thing about Tinkercad's use in education is that if your students are 12 or younger, they can join your class with a code and you can monitor or view their designs. Older students can send screenshots of their progress, so you can keep tabs on them too. Their designs are also autosaved, so you don't have to worry about the frustration that comes with their progress getting lost. It is designed for 3D printing, however, you don't have to have a 3D printer to use it. 3D printers are great, but they are expensive and printing takes time. The more kiddos you work with, the less time each kiddo can use it. Plus, they learn a lot more from the process of designing and tinkering than they would from waiting impatiently for their design to print. Tinkercad also has step-by-step lessons and projects, so if students want to learn more, they can! Day 1Since it was a new tool, we gave them time to tinker. The first day, students created an account and tried out it's features. They entered the class code and were good to go. Day 2The second day, we gave them a design challenge and provided constraints. We wanted the challenge to be something the kids were familiar with, so we decided to have them create a pencil. I never thought telling kids to create a pencil could get them to work so hard! In addition to using Tinkercad to accomplish this, they went through the engineering design process, persevered, learned from and even taught their peers. It was awesome to watch. Originally, we thought about having kids follow along a teacher-led demonstration or doing a step-by-step direction video, but we decided, we should just let them try and they definitely rose to the challenge! We wanted the kiddos to be able to share their designs with each other, so they learned how to take a screenshot and add the image to a class Google Slide for a Virtual Gallery Walk. As we presented student designs for The Great Pencil Challenge, kiddos were cheering on their classmates, pointing out interesting features and congratulating their work!! Teaching TipThe slide deck was basic. Beforehand, I grouped kids by homeroom teacher and titled the slide with their name. It was in alphabetical order by last name, to make it easier to navigate. I got the idea because this is something that has been done for teacher professional development trainings that I've attended. I would highly recommend doing this, as it can get difficult to manage students adding their own slides when there are so many. Things get inadvertently deleted. Since kiddos had editing privileges, a student actually changed the transitions for a more dramatic presentation. We did review a few digital citizenship skills such as only typing on their slide, keeping backgrounds related and only commenting appropriately. Day 3After seeing the kiddos' proficiency with the tool, we introduced the real challenge...creating a 3D solar system model! Once again, we provided them with constraints. We also gave them a few resources and a rubric. Absolutely Awesome ResourcesAllows students to input numbers and calculate the scale. Allows students to see a visual representation of each planet, its features, compare its size to another planet, see images, video clips, a timeline and much more. Days 4 and 5Rome wasn't built in a day and neither was our solar system! Kiddos were given work time to create and make sure they followed the constraints and included all of the necessary components. As students finished, they self- evaluated and peer-evaluated using the rubric. Students wrote their initials to mark their thoughts on the rubric categories. They also recorded one warm (I like how...) and one cool feedback (I wonder if...) statement. In an effort to collect data and get insight from students, they completed a Google Form. The Google Form was focused on how students felt about their ability to use the different features in Tinkercad, evaluation of the program and how they think that they could use it in the future. ExtensionsThe students are going to create Screencastify videos to take us on a tour of their solar system model. We thought that this would be better than a screenshot because it might be difficult to find an angle that shows their entire model. Plus, we wanted students to be able to explain why they made their design decisions and if they would make changes, if they created another model. We also wanted students to evaluate Tinkercad as a modeling tool. Our solar system is large and complex, so a model can only do so much to represent the actual. Want to Try this in Your classroom?Check out my Teachers Pay Teachers (CAPCOM Conrad's Creations) store! A 5E Integrated STEAM lesson plan titled A Student's Guide to the Galaxy is now available that includes rubrics!! The link to my store is above the logo to the right. There's also an exciting new addition to the Hidden Figures Young Reader's Edition Unit - that I created last year - coming soon, so stay tuned! Peace, love and space exploration,
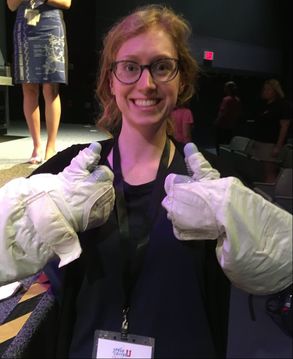
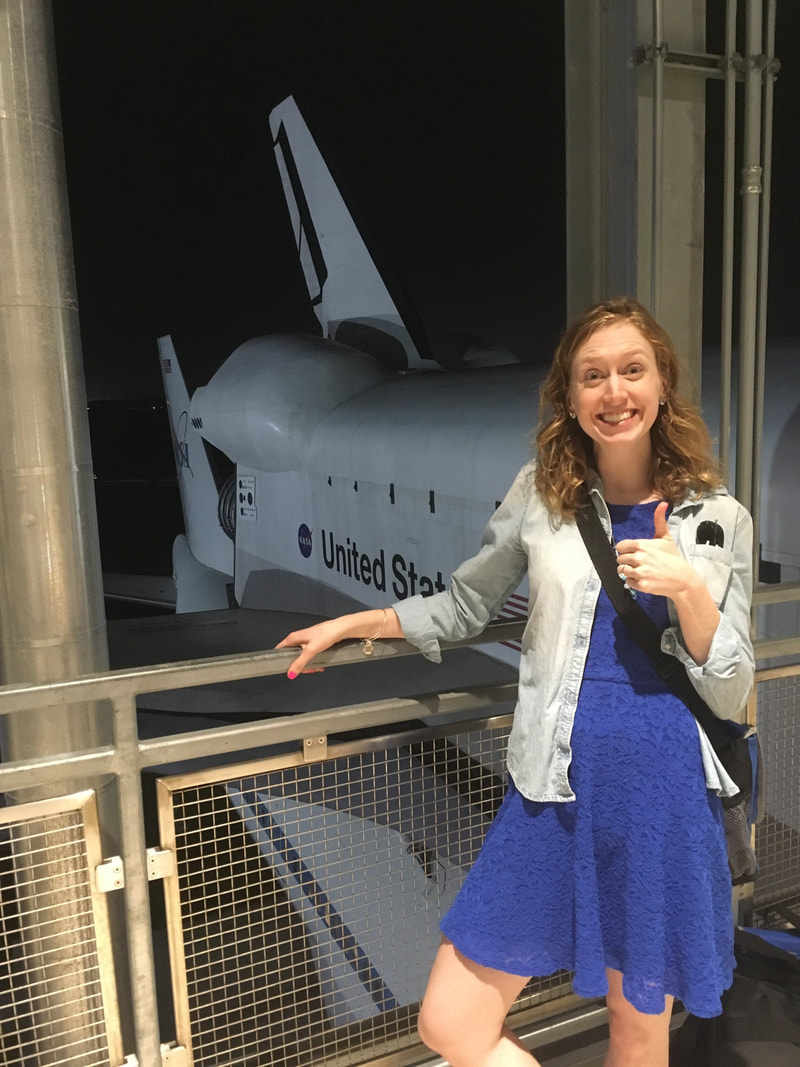
- CAPCOM Conrad The title of this post is also the title of this year's Space Exploration Educator's Conference, where this whole thing started. I decided to continue as a SEEC Crew member for my 2nd year in space exploration education. I can explain my year in space exploration, but explaining SEEC is no easy feat. It's one of those, you had to be there situations. Luckily I was able to document my experience. I even had to delete a few apps to make room for all of the photos! It's really difficult to describe it in a way that does it justice. Therefore, this post is going to be formatted in slightly different way to hopefully represent this amazing professional development. It is often said that a picture is worth a thousand words, so here goes nothing... 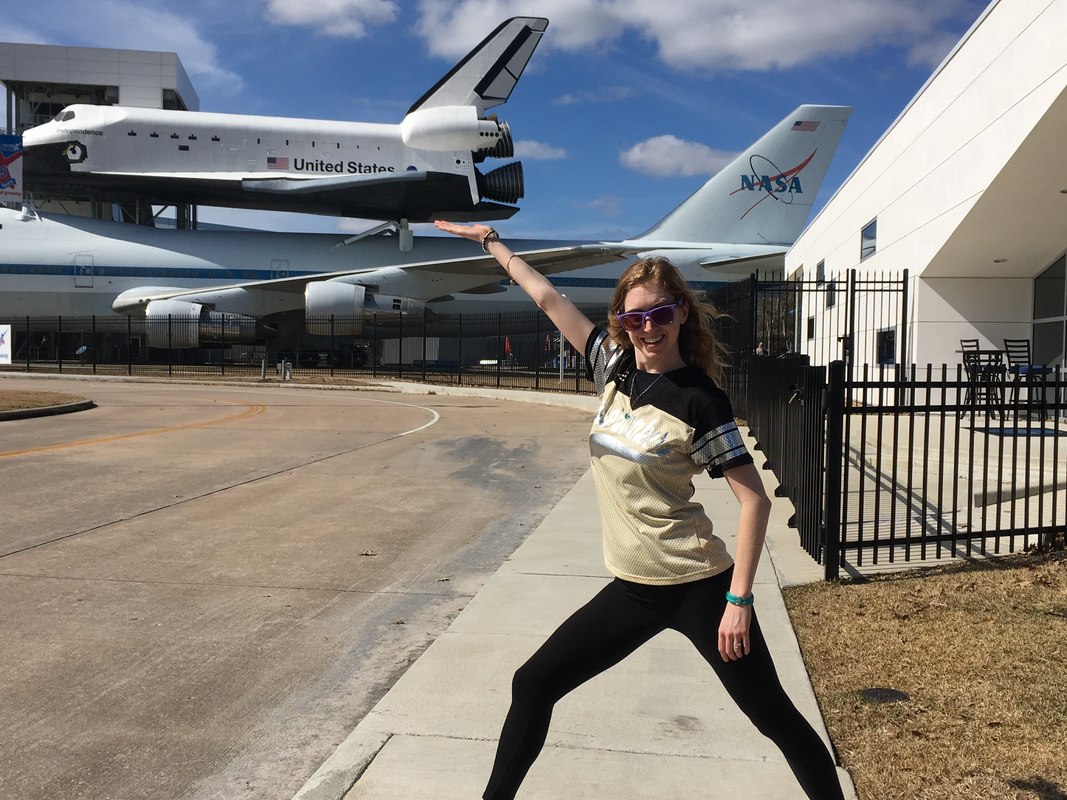 Seeing the Boeing 747 with a Space Shuttle on top in Independence Plaza never ceases to amaze me! 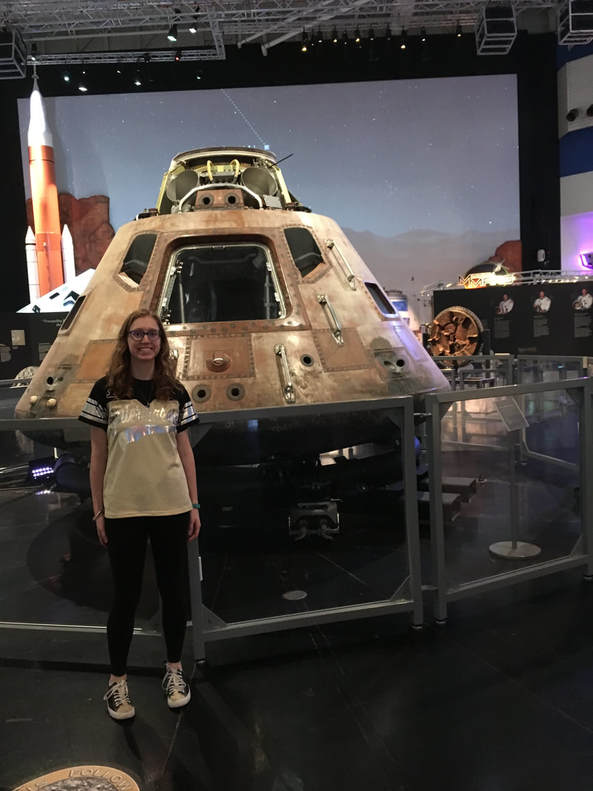 The Destination Moon exhibit is a must-see! This is the first time in 40 years that the Apollo 11 capsule has been outside of the Smithsonian Air and Space Museum. 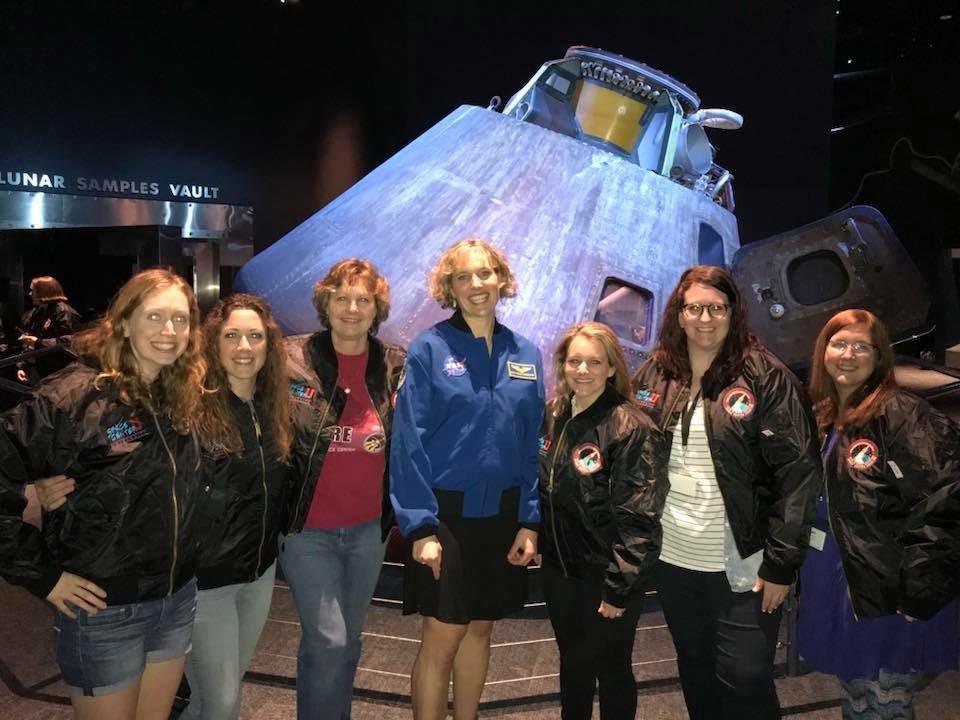 There's no better backdrop than the Apollo 17 capsule as we met teacher/retired astronaut/geologist Dottie Metcalf-Lindenberg in our new awesome SEEC Crew jackets! 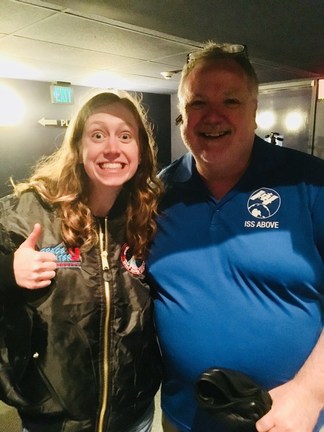 It was hard to contain my excitement when I met Liam Kennedy, inventor of the ISS Above. Our school is so grateful for this awesome addition to our Innovation Center thanks to the 100 Schools Project funded by CASIS. This video shows me describing the features of the ISS Above.  Dottie asked Joe two of the questions that I submitted "What is your ultimate goal for the Year of Education on Station? What do you hope will be your impact?". Check out a recording of our ISS Downlink with Joe Acaba, former teacher and astronaut currently on Station. You can hear the questions I submitted at the end of the video. 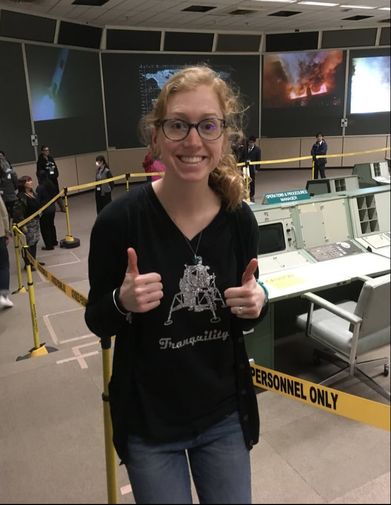 I can't believe I got to tour Historic Mission Control! 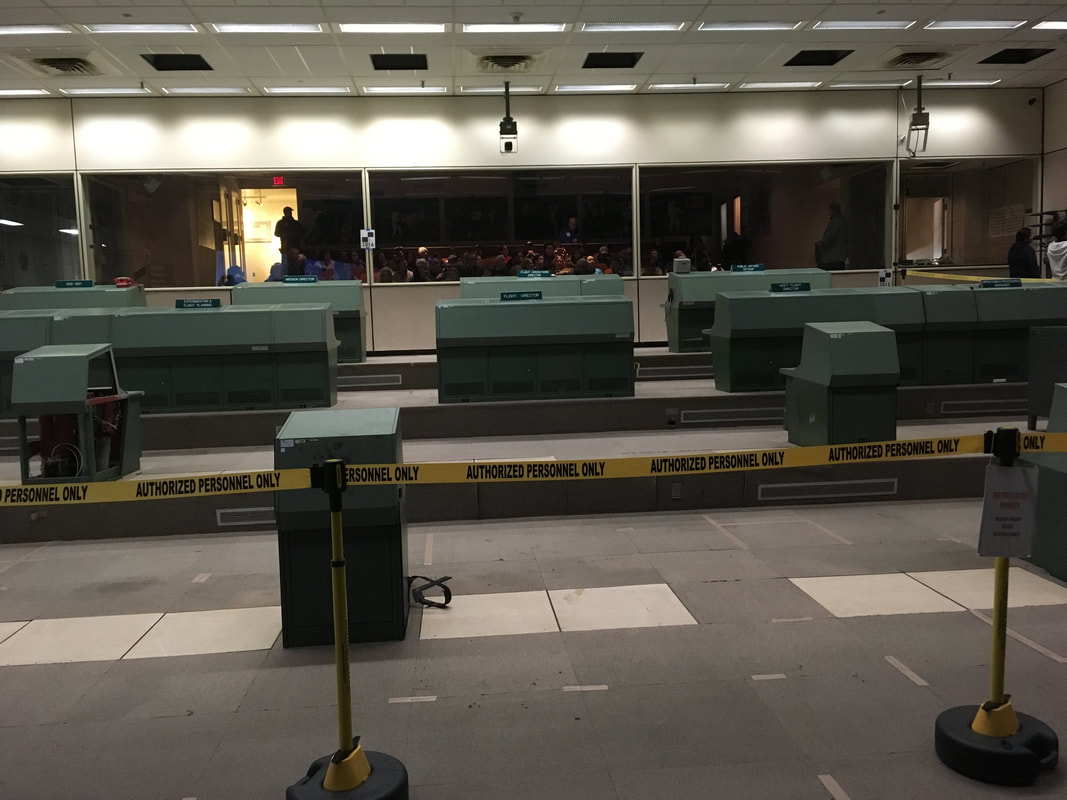 Some of the consoles are missing as restoration of this historical landmark is underway. 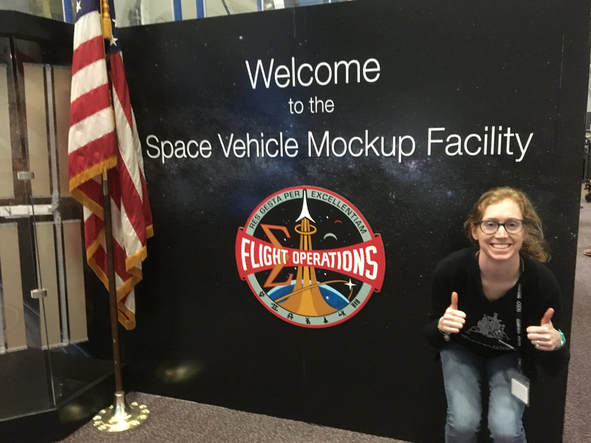 What a great tour! 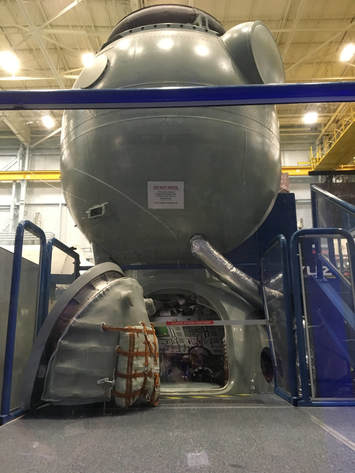 I was shocked by how small the Soyuz rocket actually is. It made me really appreciate what the astronauts go through on their journey to and from space. 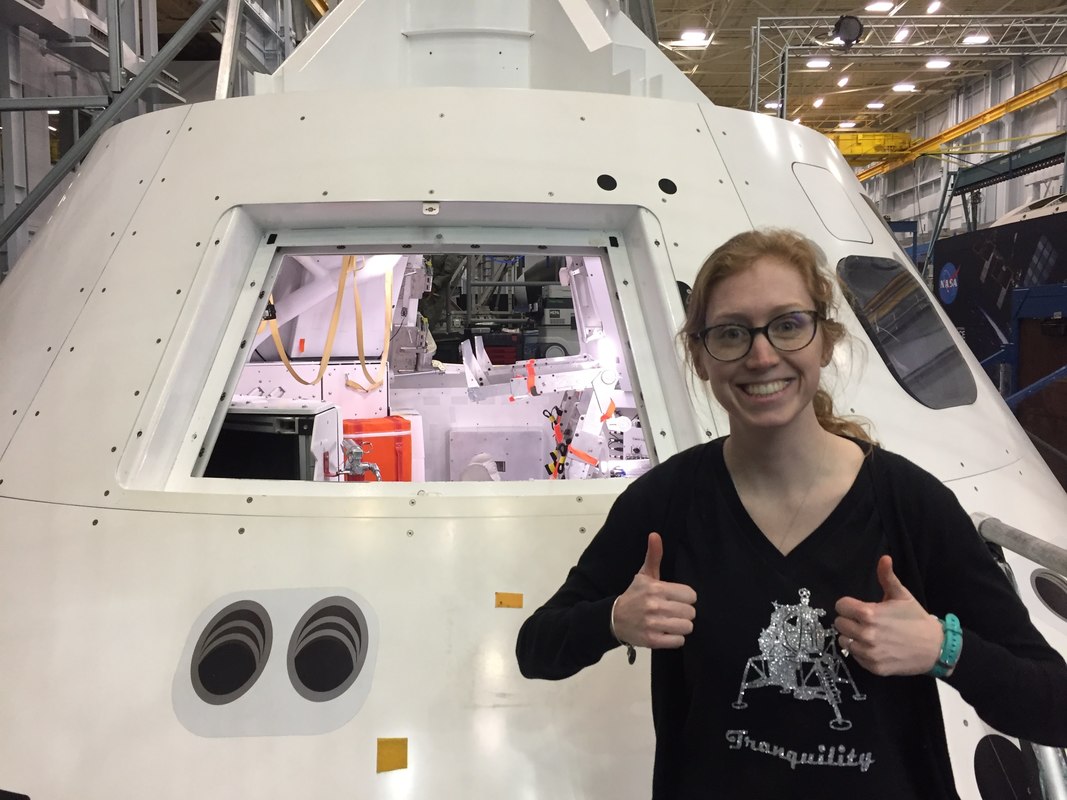 The Orion Capsule mock-up...talk about the Engineering Design Process in action! 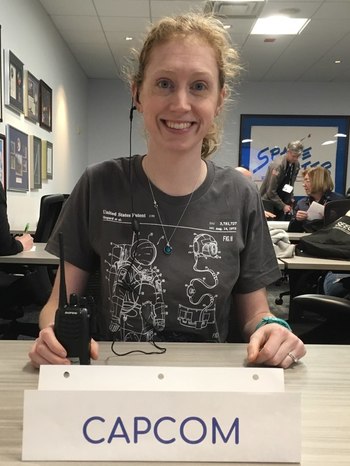 I got to fulfill my role as CAPCOM as a part of the SimEVA session. 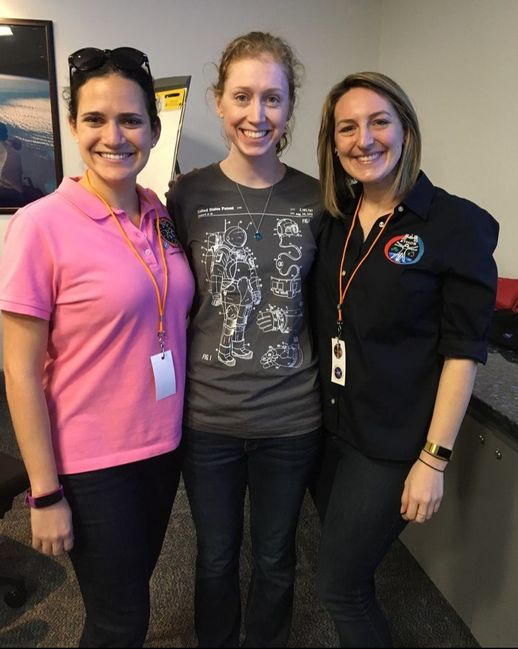 Meeting and being coached by real-life Mission Controllers was really helpful and inspiring! For those of you who have experienced SEEC - The energy, awesome presentations, lightbulb moments for things you can do in your classroom, reunion with old friends and meeting new ones - know that the reacclimation process can be challenging. After SEEC, I took part in a 2-day Google Level 1 training. Returning to school, I've been very energized and passionate to share my SEEC experience with the teachers and students I work with. I was also able to incorporate FlipGrid and Screencastify as part of Genius Hour for the first time. I'm looking forward to using what I learned from SEEC to create stations for Mission Days for our kiddos. Seeing kids fascinated by the ISS Above, hearing them interested in careers and sparking their curiosity in the SpaceX is AMAZING!!! 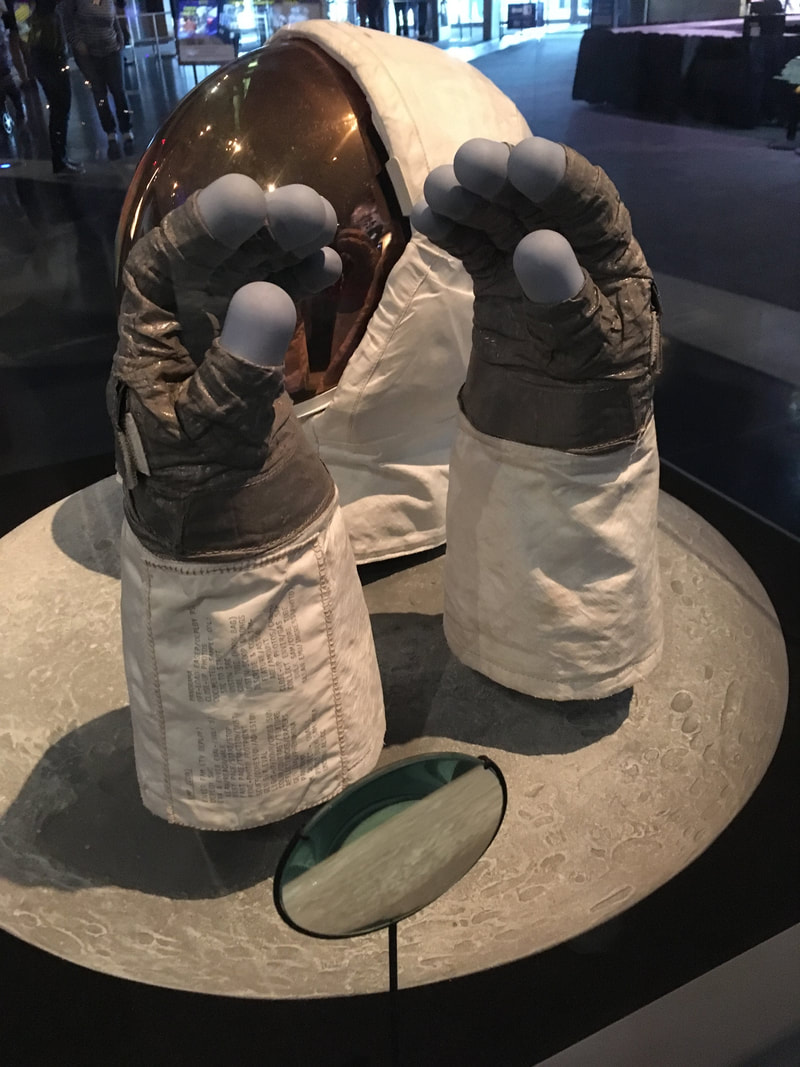 Buzz Aldrin's helmet and gloves. I don't think it's easy to give 2 thumbs up in space gloves. I would encourage each of you to venture into the unknown to this Destination Beyond. If Elon Musk can send his red Tesla into space, we can do anything :) Whether that's trying a new activity, incorporating a new technology tool, collaborating with teachers, applying to be a presenter or member of the SEEC Crew next year... It's worth it!
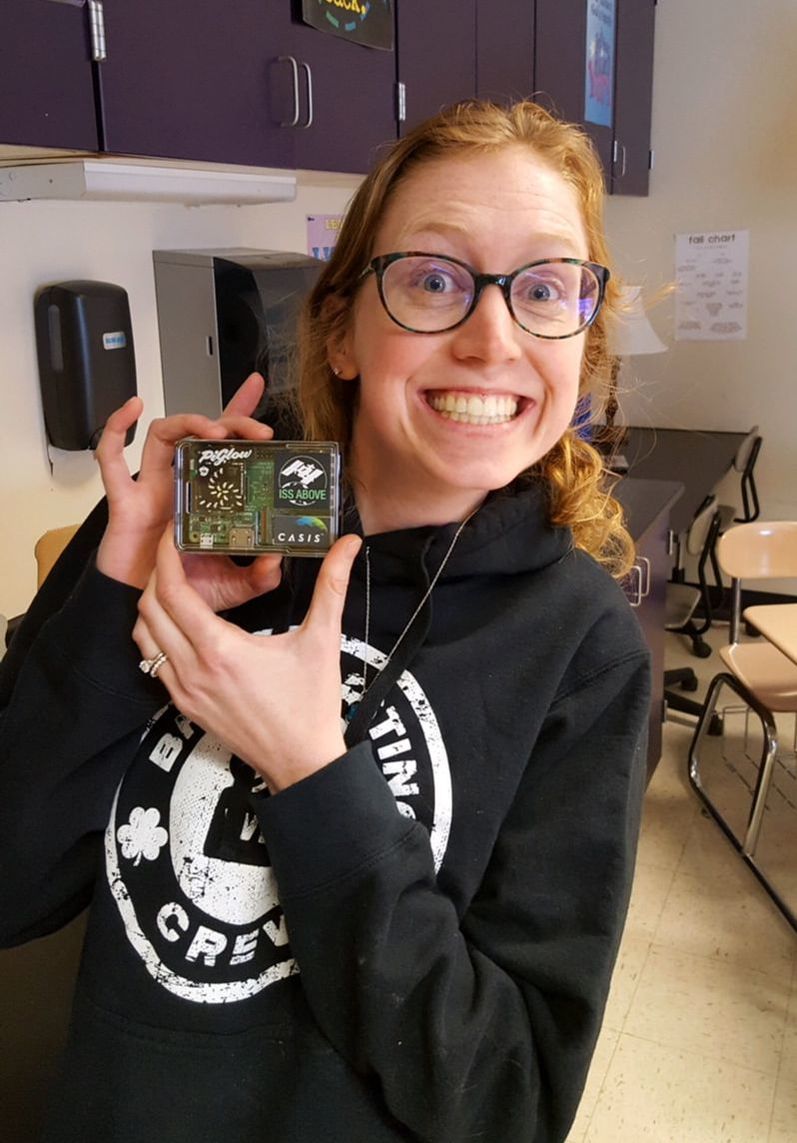
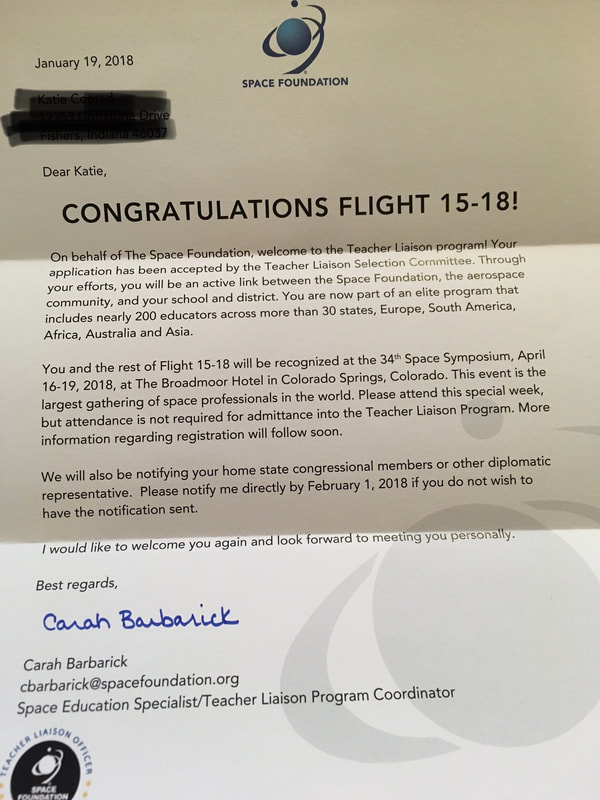
Peace, love and Space Exploration, CAPCOM Conrad A new toyIt's been quite a space dream these past few weeks. It all started when I received an e-mail from Liam Kennedy. For those of you who don't recognize that name, he's the inventor of the ISS - Above. He invented it because he wanted to share his passion for space with his grandkids :) I have never met him, but I was very excited to receive his e-mail informing me that my school had been selected to receive a free ISSAbove as part of the ISS-Above is 100 Schools. This project was made possible by funding from CASIS (Center for the Advancement of Science in Space). Well, this earthling and her students are thankful to advance space science at our school. Now, if I lost you at ISS-Above, let me go back. It's a Raspberry Pi that you can't eat. Raspberry Pi is missing an e, but it jam packed with awesomeness. The difference between the ISS-Above and other raspberry pi's, is it's capability. The ISS Above has been programmed to share data about the ISS relative to your location. There are several information screens that go through a slideshow of sorts. You can see a picture of the astronauts on board. You can see the path of the ISS on a world map, it's velocity and countdown to when the ISS will be above you. This little device will light up to tell you how far away the ISS is from your location. Depending on the color and the frequency, you can determine when the ISS will be heading your way. The best part is being able to see a LIVE stream from the cameras on the outside of the ISS. Yes, you can see the Earth from Space LIVE (when it's in daylight). Teachers, it doesn't get much better than this!! The ISS-Above requires an ethernet cable, connection to a monitor or tv and you're good to go! I would highly recommend writing a grant to get one of your own!! Curriculum materials are available to download and the possibilities are endless. I have already been able to experience kiddos' high interest in our new addition and look forward to continue to share this. Teacher LiaisonAfter knowing that an ISS-Above was coming, I was on cloud nine. It got better when I found out that I had been selected as a Teacher Liaison for Flight 15-18. As part of this, I will be able to attend the 34th Annual Space Symposium in Colorado, Springs and continue to share my passion for space-education. I look forward to this new opportunity and the ability to connect with more educators from around the country. There is more than just corn in IndianaI've always been a proud Purdue grad especially because I share that title with many astronauts. The VOSS Model (that I discussed in my previous post) is one of the many space education resources Purdue has. I wasn't sure that there were many other connections, but I was pleasantly surprised when I received a call from Greg McCauley. He is the CEO of the Link Observatory Space Science Institute in Martinsville, Indiana. I hadn't heard of it until a couple weeks ago. I was able to meet with Greg and was very interested to find out that he had worked at JSC for the Apollo 15 - 17 missions!! He definitely shares my passion for space and STEM Education. Through their DiscoverSpace STEM Programs, you can connect your students to NASA Resources. NASA has so many great resources and as educators, we are all aware of the lack of time we have to navigate all of them. You don't have to be in Indiana to access this resource, it's an entirely digital platform and the possibilities are endless! You'll definitely want to look into getting this at your school! These Boots are Made for WalkingYesterday, astronauts Mark Vande Hei and Scott Tingle were on a spacewalk- or more technically known as an Extravehicular activity (EVA) - repairing part of the robotic CanadaArm2. Another teacher called me to make sure I knew that the spacewalk is on and was unaware that one of the ISS-Above screens had told me that it was happening. As NASA TV aired it live, I was able to explain how astronauts train in the Neutral Buoyancy Laboratory (NBL) and explain features of the spacesuit thanks to sessions and tours at SEEC, PD from the Indianapolis Children's Museum, and this past summer's Survival Training in the NBL. I absolutely loved seeing kids excited and curious about what was going on. The next scheduled spacewalk is Monday morning January 29th. It's definitely something you should check out with your students. Back to the ClassroomYesterday night, I had my first course as part of the NASA Endeavor Program. After reading more about it and hearing what a great experience it was firsthand from a fellow SEEC Crew member, I decided to sign up. I, like all of you, am a lifelong learner and love school. In the back of my mind, I considered going back to school, but I didn't want to take classes just to say that I did. I wanted to choose something that I was passionate about. So, when I found out that there were classes that used NASA resources to enhance STEM education, I was in. I'll keep you updated as I learn more. Last, but Definitely not least...In T-7 days, I will be returning to Space Center Houston for the 24th Annual Space Exploration Educator's Conference!!!!! To say that I haven't been counting down would be a lie. It's hard to believe that almost a year ago, I began my year in space adventure. When I first saw the 747 and Shuttle outside the Center, I was blown away. When I walked in and saw a lunar capsule hanging from the ceiling, I knew that I was in the right place. Little did I know what a profound impact the stellar conference, the awesome people and the amazing program would have on me as an educator and as a person. I'm thrilled to return this year as a presenter, a veteran, with a new last name, a different job and of course, a whole lot to share. I'm excited to be reunited with the Crew and connect with new space enthusiasts. In case you didn't quite get my enthusiasm, it's gone viral!
It's been great being able to share my space resources with the 6th Grade teachers as they embark on the Earth and Space Science Unit and there's plenty more where that came from. Peace, love and space exploration, CAPCOM Conrad |
AuthorApollo 13 fan. Educator. Lifelong Learner. Third generation Boilermaker. Space Exploration Enthusiast. Collaborator. 
Click Subscribe to stay updated!Archives
July 2022
Categories
All
|


 RSS Feed
