|
Probably not, but with the crazy weather Indiana has been having, you can sled on Earth in April! Last summer I attended the Science Learning through Engineering Design (SLED) Summer Institute. SLED is a Purdue University program funded by an NSF Math Science Partnership and is a true collaboration among several schools and departments. It was a great hands-on experience and I took a lot from it; including how to set-up and use a notebook, vocabulary and the overall SLED structure. SLED is targeted for 3rd-6th grade students, but I definitely think it can be used in other grade levels. SLED has curriculum available for many different science and engineering standards. The curriculum available is great, but what I find the most value in, is the structure and questioning. The structure is simple, yet powerful. The best part is how meaningful and interactive it is for the students. I've been able to see this firsthand. The collaboration and conversations students have with each other is awesome!! SLED allows each student to be individually involved in their learning while also working with their peers. Students have to make choices and defend their decisions. The structure and terminology remains consistent regardless of content or standards being covered. I have been able to co-plan 2 units with my awesome coworker Jaime using the SLED structure and incorporate space exploration! The first unit was Lunar Landers about a month ago and the second unit is next week. It's all about the Voyager Spacecraft and the Golden Record! Stay tuned for updates on that. We're really excited about it!! Lunar Lander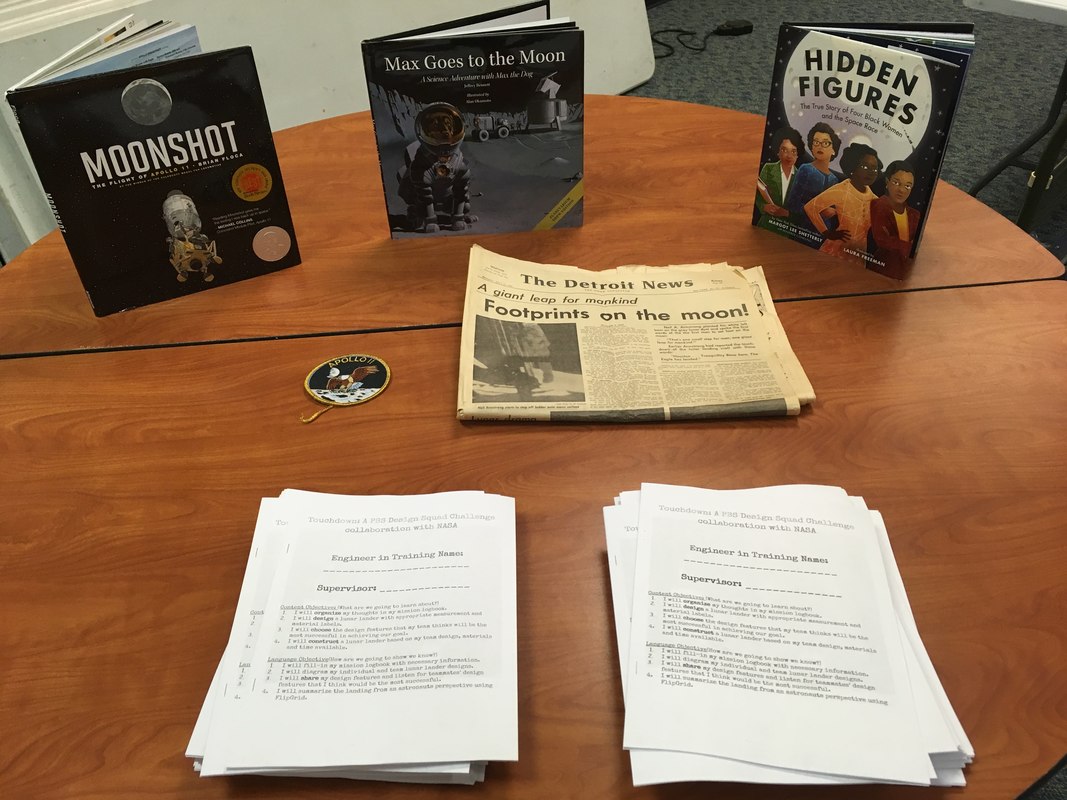 My awesome, former coworker, Steve taught me that kids are more excited when you set the scene. Students grabbed a logbook from the table when they walked in on day 1. The Lunar Lander lesson we modified was a NASA PBS Design Squad Challenge called Touchdown. It is one of six space-themed engineering design challenges in the On the Moon Activity Guide. Our modifications included putting the activity in the SLED structure, utilizing the LAUNCH Cycle (Design Thinking Framework) and Innovator's Compass. Exploring Beyond (2:36) - NASA Johnson This is a great video to get kiddos hooked. I saw it for the first time at a Space Center U Teacher Professional Development at Space Center Houston last summer. SLED STructure1) Design brief - Create a short story that gives meaning, purpose and connection to the activity. Students read a couple paragraphs to determine background information. 2) Identification - Using the design brief, students identify the following & record it.
4) Team Design - All teammates share individual designs and provide ONLY positive feedback. Best way to do this is to have a time limit (1 min) and review expectations for this process.
6) Test - Each team tests their design. *Determine how design will be tested BEFORE testing. 7) Communication - Share results
8) Improve and redesign Check out the Kiddos in ActionAssessment OptionsThis whole design challenge process is a performance assessment. A) Formative Assessment happens throughout this process with the logbook. - Observing student designs and asking them to explain the different features and why they chose them. - Listening in on team design brainstorms. It's a great way to evaluate team dynamic, group member's collaboration and students' abilities to persuade, defend and support their ideas. B) Summative Assessment - Checkpoints - Team Design Data - Did the design meet the requirements, constraints and solve the problem? - Science content -> How is the student able to explain? - Overall Evaluation Rubric - Redesign -> How did they makes changes to improve their design? Instead of using a notebook, we used the SLED structure to create a logbook for students to fill in. Each day we had mission checkpoints. After testing, students also answered journal entry questions to reflect on the process. Students recorded a FlipGrid video to describe their lunar landing from the astronaut's perspective. **I will be adding our logbook to my TPT store. Tech Tool: FlipgridThis awesome tech tool was also introduced to me at Space Center Houston last summer. It is FREE for educators! At first I wasn't sure how I would use it with my kiddos, but it's a great tool for your toolbox. It gives students another way to respond. You create a grid, give students the code and they can record their own video response to questions or prompts that you ask. Like many new tools, especially technology, I would highly recommend reviewing expectations, appropriate responses and commenting, etc. I tell my students that technology is a privilege and they need to use it correctly as an educational tool. *Note:It does requires a device with a camera to use. Settings/Options - Moderator - Allows you to view student videos BEFORE they are added to the grid. - Design - Allows students to add stickers - Reply capabilities - View, rate, comment and/or record a reply post - Rubric and evaluate them. - The free version allows a maximum of 90 second record time. Students love talking with peers, sharing their individual thoughts and ideas, responding to others and making videos, so why not allow them to harness this excitement educationally? I hope that you're able to use some, if not all, of this in your classroom! I've been very happily busy co-designing and teaching projects that I'm excited about. Therefore, I am behind on updating my TPT store with resources. It's a summer project, if not before.
Peace, love and space exploration, -CAPCOM Conrad
0 Comments
My first project as a SEEC Crew member was the Hidden Figures Unit that I created over my Spring Break almost a year ago, which is hard to believe! I really enjoyed creating the unit and teaching it to my kiddos. I also saw the value and interest that my students took in it and enjoyed sharing the journey on my blog. When I created the unit, I just taught it to my homeroom students at first. I was not trying to keep it from others, but I wanted to wrap my head around it and see how it all worked before sharing it with others. It was like a pilot program and I made changes throughout the unit as I found more helpful resources. I've been excited to hear that other teachers have been sharing the Hidden Figures Young Readers Edition book with their kiddos too. A few teachers at my school are actually reading it with their kiddos right now. A couple weeks ago, a teacher asked if there was an audio recording of the book. I thought I had found a lot of the resources available and I have to admit that a recording was not something that I had ever searched for during this process! In case you're curious, an audiobook does exist. We thought that it be a great project for students though; creating their own version of an audiobook. We wanted it to be more than just a recording however. So, each group is assigned a chapter and they're focused on identifying the characters and key vocabulary. They will also write a chapter summary and create a wordle to represent the chapter. All of this information will be typed in Google Slides. Using the resources available to students, their Chromebooks, we decided the best tool for them to use was Screencastify. Tech Tool Feature: ScreencastifyScreencastify is an extension for Google Chrome. You can add it to Chrome for free by using the webstore. What's great about Screencastify is that it's easy to use and with the free version, you can record videos up to 10 minutes. I'll be honest, I found that out because I reached the limit! Screencastify allows you to record your voice over your desktop or if you have a webcam, you can also record a video. Since Screencastify is a Chrome extension, it creates a folder in your Google Drive and automatically stores all of your videos there! It acts like any other files in Google Drive, so you are able to share it too. I've been using it to record my desktop and create demonstration videos to teach students how to do something (like create an action plan in Google Sheets). It's a great way to meet the needs of your visual and auditory learners. They are able to watch the video at their own pace and pause it, if need be. It allows students who have been absent to catch up and allows teachers to save their voice from repeated directions. Book Shout OUtA Hidden Figures picture book was released in January and it's great! It's by the same author (Margot Lee Shetterly) and is titled Hidden Figures: The True Story of Four Black Women in the Space Race. It's a good way to build background for students before reading the Young Readers Edition, as a way to share the story with younger students or you don't have time to tackle the Young Readers Edition. I would highly recommend it. The illustrations by Laura Freeman are eye-catching and full of color and the book is informative and entertaining. You may know that Scott Kelly has a book for lifelong learners called Endurance: A Year in Space, A Lifetime of Discovery. I haven't read it because I'm currently engrossed with Riding Rockets - The Outrageous Tales of a Space Shuttle Astronaut by: Astronaut Mike Mullane . You may not know that Scott Kelly also has a picture book called My Journey to the Stars. It's a great combination of illustrations by Andre Ceolin and pictures that connect with a younger audience. In the book, Scott talks about events as a kid and his life as an astronaut. See what he says about the book, in his own words below. The students are in the midst of this Hidden Figures Podcast Project. As they progress, I'll be sure to share!! In my true fashion, I have created resources and a rubric, of course, that would allow you to create your own project in your classroom. As soon as formatting is complete, I'll be putting it in my Teachers Pay Teacher store. Tinkercad resources will be added soon as well. Students are using Screencastify to create a virtual tour of their solar system!! This week, I'm co-teaching what we're calling, Mission Days. We've adapted the NASA & PBS Design Squad Touchdown lesson to incorporate the Purdue SLED (Science Learning through Engineering Design) structure. I've been thrilled to continue to also share space exploration outside the classroom as I embark on my second year in space. A few teachers have been showing the PBS Documentary, A Year in Space , that chronicles Scott Kelly's journey, to their classes. One teacher asked if she could borrow it to take home because she had been talking about it and her husband really wanted to see it. A couple of nights ago when I went out to dinner, the host stopped me. I was wearing my Crew jacket and he asked what my patch was. I explained that I was a teacher who was working on lessons to teach space exploration. His response was "dope". From a teenage boy, I would say that's a pretty big compliment! I can't wait to update you more on all of these awesome space happenings! Until then... Peace, love and space exploration,
- CAPCOM Conrad |
AuthorApollo 13 fan. Educator. Lifelong Learner. Third generation Boilermaker. Space Exploration Enthusiast. Collaborator. 
Click Subscribe to stay updated!Archives
July 2022
Categories
All
|
 RSS Feed
